Featured image for how to hang led string lights in bedroom
Image source: en.rangdong.com.vn
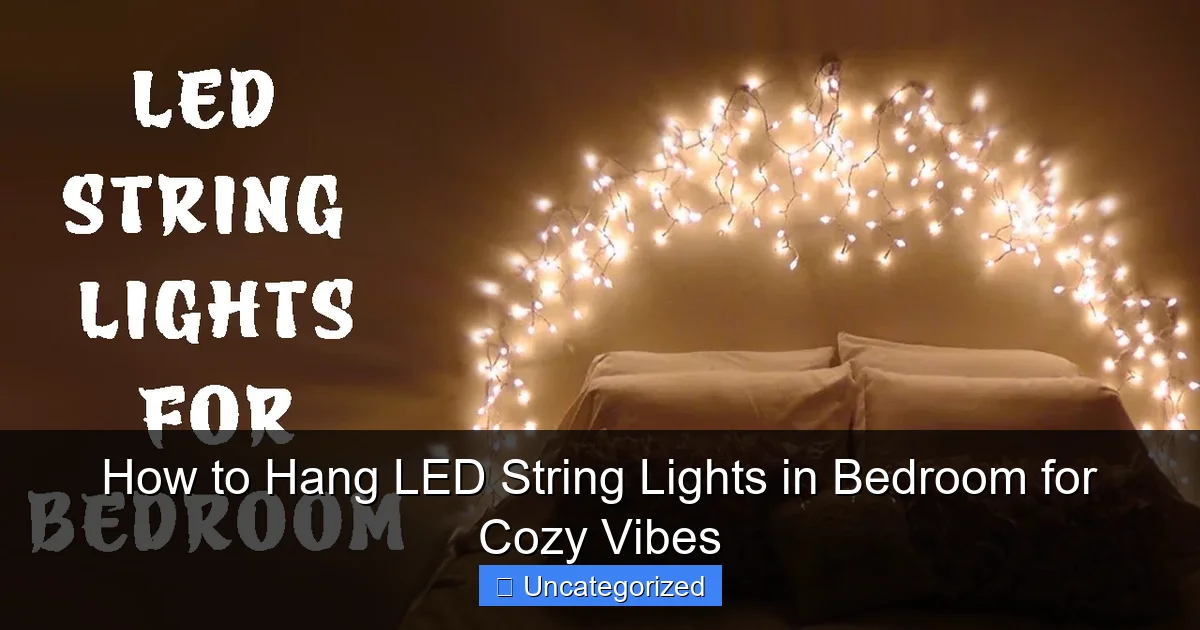
Transform your bedroom into a cozy retreat by hanging LED string lights along the headboard or wall for instant ambiance. Use adhesive hooks, clips, or discreet nails to secure the lights without damaging surfaces, and drape them in cascading waves or geometric patterns for visual interest. Opt for warm white or color-changing LEDs to enhance the mood and create a soothing, personalized glow.
How to Hang LED String Lights in Bedroom for Cozy Vibes
Key Takeaways
- Plan your layout: Sketch light placement before hanging for balanced, cozy coverage.
- Use adhesive hooks: Secure lights without nails or damage to walls.
- Highlight focal points: Drape lights around headboards or mirrors for ambiance.
- Keep cords hidden: Tuck wires behind furniture or use cord organizers.
- Layer lighting: Combine string lights with lamps for depth and warmth.
- Test before finalizing: Ensure brightness and spacing suit your mood needs.
Why This Matters / Understanding the Problem
Imagine walking into your bedroom after a long day and being greeted by soft, warm glows that wrap around your space like a hug. That’s the magic of how to hang LED string lights in bedroom for cozy vibes. These lights don’t just brighten a room—they transform it into a sanctuary of calm, relaxation, and personal style.
Many people struggle with creating a bedroom that feels both functional and inviting. Harsh overhead lighting, clutter, and a lack of ambiance can make even the coziest bed feel cold. That’s where LED string lights come in. They’re affordable, energy-efficient, and easy to install—no electrician required. But here’s the catch: if you don’t hang them right, they can look messy, saggy, or even fall down mid-movie night.
Whether you’re setting up a dreamy reading nook, a romantic retreat, or just want to make your space feel more “homey,” knowing how to hang LED string lights in bedroom for cozy vibes is a game-changer. With the right approach, you can create a lighting effect that’s not only Instagram-worthy but also deeply comforting.
This guide walks you through every step—from choosing the best lights to securing them safely—so you can enjoy a bedroom that feels like a five-star hotel suite, all without breaking the bank or your walls.
What You Need
Before we dive into the steps, let’s gather your toolkit. The good news? You don’t need fancy gear or DIY expertise. Most of these items are already in your home or available at a dollar store.
Visual guide about how to hang led string lights in bedroom
Image source: i.pinimg.com
- LED string lights (battery-powered or USB-powered; warm white or soft color tones work best for cozy vibes)
- Measuring tape (to plan your layout)
- Command hooks, picture hangers, or adhesive clips (damage-free options for walls, ceilings, and headboards)
- Thumbtacks or small nails (if you don’t mind tiny holes—great for wood or drywall)
- Zip ties or twist ties (for bundling excess wire)
- Scissors (to trim zip ties or adjust wire length)
- Level (optional, but helpful for straight lines)
- Extension cord or power strip (if using plug-in lights)
- Timer or smart plug (optional, for automatic on/off)
Pro tip: Choose lights with a warm white or soft amber glow. These colors mimic candlelight and promote relaxation—perfect for winding down at night. Avoid cool white or overly bright RGB lights if you’re aiming for cozy vibes.
Warning: Never use nails, screws, or heavy-duty hooks on plaster walls without checking for studs. Plaster can crack easily. Stick to adhesive hooks rated for your wall type.
Step-by-Step Guide to How to Hang LED String Lights in Bedroom for Cozy Vibes
Step 1: Choose Your LED String Lights Wisely
Not all LED string lights are created equal. For how to hang LED string lights in bedroom for cozy vibes, you want lights that match your room’s mood and layout.
- Length: Measure your space first. For a headboard, 10–15 feet is usually enough. For a full wall or ceiling perimeter, go 20–30 feet.
- Power source: Battery-powered lights are easier to install (no outlet needed), but plug-in or USB-powered ones last longer and are better for permanent setups.
- Bulb type: Choose micro LEDs (tiny bulbs) or globe LEDs for a soft, diffused glow. Avoid harsh, bright LEDs.
- Color temperature: 2700K–3000K (warm white) is ideal. It feels inviting, not clinical.
- Features: Look for lights with a timer, remote control, or dimmable settings for extra convenience.
Example: A 16-foot warm white micro LED strand with a USB plug and remote control is perfect for draping over a headboard. It gives you flexibility, control, and that soft, glowing effect you’re after.
Pro tip: Test your lights before hanging. Plug them in or insert batteries to make sure every bulb works. Nothing kills cozy vibes like a dark strand in the middle of your setup.
Step 2: Plan Your Layout (Where & How to Hang)
Before you start sticking things to your walls, take 10 minutes to plan. This step saves you from redoing your entire setup later.
Ask yourself:
- Do you want a headboard accent? (Most popular)
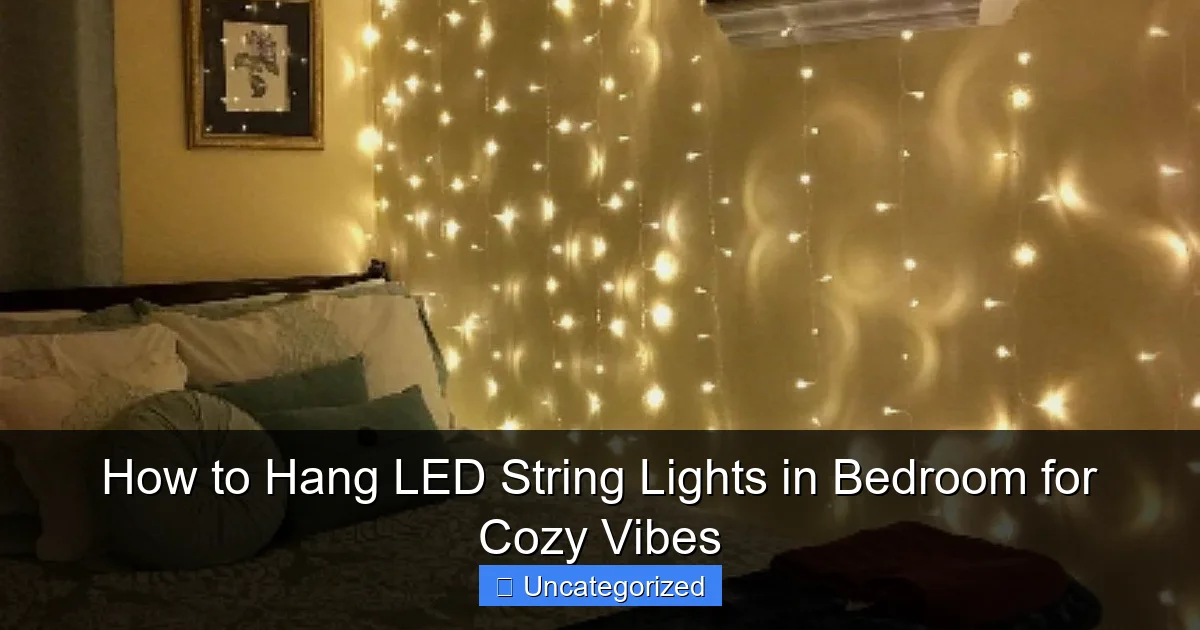
- A ceiling canopy? (Like a starry sky)
- A wall feature? (e.g., behind a bookshelf, around a mirror)
- Or a room perimeter? (around the top of the walls)
Sketch a quick diagram on paper or use a photo editing app to visualize the placement. For example:
- Headboard: Drape lights in a U-shape, zigzag, or straight line across the top.
- Ceiling: Create a “starburst” pattern from the center of the room or follow the ceiling edges.
- Wall: Frame a mirror, artwork, or create a geometric shape (like a triangle or heart).
Use painter’s tape to mark anchor points. This lets you “try on” the layout without committing. Step back and check: Does it feel balanced? Does it block your view or create glare?
Pro tip: For a cozy, intimate feel, focus lights on one or two focal points (like the headboard or a reading corner). Overdoing it can make the room feel like a carnival.
Step 3: Prep Your Surfaces & Test Adhesives
Clean the areas where you’ll attach hooks or clips. Dust, grease, or old tape residue can weaken adhesives and cause your lights to fall.
- Wipe walls, headboards, and ceilings with a damp cloth. Let dry completely.
- For wood or painted surfaces, use rubbing alcohol for extra stickiness.
- For textured walls (like popcorn ceilings), avoid adhesive clips—they won’t stick well. Use small nails or thumbtacks instead.
Test your adhesive hooks first. Press one firmly against the wall for 30 seconds. Wait 24 hours (per manufacturer’s instructions), then gently tug it. If it holds, you’re good to go.
For battery-powered lights, place the battery pack in a discreet spot—under the bed, behind a nightstand, or inside a drawer. Use a small hook or tape to keep it from dangling.
Warning: Don’t overload adhesive hooks. Most are rated for 1–2 lbs. If your lights are heavy (over 3 lbs), use multiple hooks or switch to nails.
Step 4: Install Hooks, Clips, or Anchors
Now it’s time to secure your mounting points. This is the backbone of your setup, so do it right.
- Adhesive hooks: Peel the backing and press firmly for 30 seconds. Let cure for 1–24 hours (check the label).
- Thumbtacks or nails: Hammer gently into drywall, wood, or headboards. For drywall, use a small pilot hole if needed.
- Ceiling clips: Use adhesive clips rated for ceilings or small screws into joists (if you’re confident).
- Behind headboards: If your headboard is thick, you can often just tuck the lights between the headboard and wall.
Space hooks 12–18 inches apart. This prevents sagging and gives you control over the light pattern. For a zigzag design, alternate hooks left and right. For a straight line, keep them aligned.
Use a level (or your phone’s level app) to keep lines straight. A crooked setup can ruin the cozy effect.
Pro tip: For a floating look, install hooks slightly higher than the light strand. This creates gentle curves and hides the hardware.
Step 5: Hang the Lights (With Style)
Here’s where the magic happens. Start from one end and work your way across.
- Begin at the power source (battery pack or outlet).
- Attach the first bulb or wire to the first hook. Don’t pull too tight—leave a little slack for movement.
- Work your way along the path, draping the lights over each hook or tucking them into clips.
- For a curved or draped look, let the lights hang slightly between hooks.
- For a straight or geometric look, pull the wire taut and secure it tightly.
Common hanging styles:
- U-shape: Great for headboards. Lights go up one side, across the top, and down the other.
- Zigzag: Adds visual interest. Alternate left and right hooks.
- Canopy: For ceilings, create a starburst or grid pattern. Use ceiling clips or hooks.
- Perimeter: Follow the top edge of your walls. Use wall hooks every 12–16 inches.
As you go, check for even spacing. Adjust bulbs so they face outward (not into the wall) for maximum glow.
Pro tip: If your lights have a plug end, leave it near an outlet. For battery packs, hide them in a decorative box or under fabric.
Step 6: Manage the Wires & Power Source
Messy wires kill the cozy vibe. Tidy them up for a clean, polished look.
- Use zip ties or twist ties to bundle excess wire behind the lights or along the wall.
- Hide the battery pack or power cord behind furniture, under a rug, or inside a decorative basket.
- For plug-in lights, run the cord along the baseboard or use cord clips to keep it flush.
- If the wire is too long, loop it neatly and secure it with a zip tie. Trim excess with scissors.
For a seamless look, use white cord clips that match your wall color. Or, paint them to blend in.
If you’re using a smart plug or timer, plug it in now. Set it to turn on at dusk and off at bedtime for automatic cozy vibes.
Warning: Never cover power cords with rugs or furniture. This can cause overheating and fire hazards.
Step 7: Test, Adjust, and Enjoy
Turn on your lights and take a step back. Look for:
- Even brightness (no dark spots)
- No sagging or pulling on hooks
- No glare in your eyes when lying in bed
- Wires that are hidden and safe
Make small adjustments:
- Shift bulbs to face outward.
- Add more slack to sagging sections.
- Move hooks slightly for better alignment.
Snap a photo in low light. Does it look warm and inviting? If yes—congrats! You’ve mastered how to hang LED string lights in bedroom for cozy vibes.
Pro tip: Add a dimmer or remote control for mood lighting. Dim the lights for bedtime or brighten them for reading.
Pro Tips & Common Mistakes to Avoid
Even the best plans can go sideways. Here’s how to avoid the most common pitfalls—and level up your lighting game.
✅ Use the Right Adhesive for Your Wall Type
Not all walls are the same. Use:
- Command strips/hooks: Painted drywall, wood, glass
- Rubber-based adhesive clips: Smooth surfaces
- Small nails: Textured walls, plaster, or if you’re okay with tiny holes
❌ Don’t Overload Hooks
One hook = one strand. If you’re layering lights, use multiple hooks. Overloading causes sagging or falling.
✅ Mix Light Types for Depth
Try combining micro LEDs with globe lights or fairy lights. This adds dimension and makes the space feel richer.
❌ Avoid Harsh Light Angles
Don’t point bulbs directly at your bed or eyes. Angle them toward the wall or ceiling for soft, indirect light.
✅ Create a Focal Point
Focus your lights on one area (e.g., the bed). This draws the eye and creates a “zone” of comfort.
❌ Skip the Planning Step
Measuring and sketching saves time and frustration. A 10-minute plan prevents a 2-hour redo.
✅ Use a Timer or Smart Plug
Set your lights to turn on at sunset and off at bedtime. No more fumbling in the dark—just automatic cozy vibes.
❌ Ignore Battery Life
If using battery-powered lights, check battery life. A dead strand kills the mood. Use rechargeable batteries or keep spares handy.
Real-life example: Sarah hung her lights with just two hooks—and they sagged after a week. After adding three more hooks and a dimmer, her bedroom felt like a boutique hotel. The lesson? Plan for support.
FAQs About How to Hang LED String Lights in Bedroom for Cozy Vibes
Q1: Can I hang LED string lights without damaging my walls?
Absolutely! Use Command hooks, adhesive clips, or damage-free picture hangers. They hold up to 2 lbs and remove cleanly. Just follow the instructions and don’t overload them.
Q2: What’s the best placement for cozy vibes?
The headboard is the most popular—and effective—spot. Drape lights above or behind your bed for a warm, intimate glow. A ceiling canopy or wall feature behind a reading chair also works beautifully.
Q3: How do I hide the wires and battery pack?
- Use zip ties to bundle wires.
- Tuck the battery pack under the bed or behind a nightstand.
- Use a decorative box or fabric pouch to hide it.
- Run cords along baseboards with cord clips.
For plug-in lights, use a smart plug to control them remotely—no need to touch the cord.
Q4: Are battery-powered lights safe for overnight use?
Yes, if they’re LEDs and have a low voltage (usually 3–5V). They generate little heat and use minimal power. But always use a timer to turn them off automatically—this saves batteries and reduces fire risk.
Q5: Can I hang lights on a textured wall or popcorn ceiling?
Adhesive clips may not stick well. Use small nails or thumbtacks instead. For ceilings, consider hanging from a ceiling hook or using a lightweight curtain rod as a mounting rail.
Q6: How long do LED string lights last?
Most LEDs last 25,000–50,000 hours (that’s 5–10 years of regular use). Battery-powered lights depend on battery quality. Rechargeable batteries last longer and are more eco-friendly.
Q7: What if my lights keep falling down?
This usually means:
- Hooks aren’t rated for the weight.
- Adhesives weren’t cured long enough.
- Walls are too dirty or textured.
Solution: Use stronger hooks, clean the surface, and let adhesives cure 24 hours. Or switch to nails for a permanent fix.
Final Thoughts
Creating a bedroom with cozy vibes isn’t about spending a fortune on decor—it’s about the small, intentional touches. Knowing how to hang LED string lights in bedroom for cozy vibes is one of the easiest, most impactful upgrades you can make.
From choosing the right lights to managing wires and avoiding sagging, every step matters. But the reward? A space that feels warm, inviting, and uniquely yours. Whether you’re reading, unwinding, or just enjoying a quiet night, soft LED glow makes everything better.
So grab your lights, follow this guide, and start tonight. Test your layout, hang with care, and enjoy the magic of ambient lighting. And remember: cozy isn’t perfect—it’s personal. Let your lights reflect your style, your mood, and your home.
Actionable tip: Start with one small area—your headboard. Once you nail it, expand to other zones. In a week, you’ll have a bedroom that feels like a retreat.
Now go light it up—and let the cozy vibes begin.

