Featured image for clip string lights to fence
Image source: images.nexusapp.co
Transform your outdoor space instantly by clipping string lights to your fence for a magical, inviting glow. With simple tools and weather-resistant clips, you can achieve a professional-looking setup that enhances ambiance and extends your living area into the night. Strategic placement and secure fastening ensure a stunning, safe display all season long.
Key Takeaways
- Plan spacing: Measure and mark clip positions evenly for balanced lighting.
- Use weatherproof clips: Choose durable, outdoor-rated clips to secure lights safely.
- Test lights first: Ensure all bulbs work before clipping to avoid rework.
- Secure tightly: Firmly attach clips to prevent sagging or wind damage.
- Hide cords neatly: Route wires discreetly for a clean, professional look.
- Opt for symmetry: Align lights parallel to fence lines for visual harmony.
📑 Table of Contents
- Why Clip String Lights to a Fence? The Magic of Outdoor Ambiance
- Choosing the Right String Lights for Your Fence
- Tools and Materials You’ll Need to Clip String Lights to Fence
- Step-by-Step: How to Clip String Lights to Fence (With Tips)
- Creative Ideas and Design Tips for Maximum Impact
- Maintenance, Safety, and Long-Term Care
- Data Comparison: Popular Fence Light Clips (2024)
- Final Thoughts: Light Up Your Life, One Clip at a Time
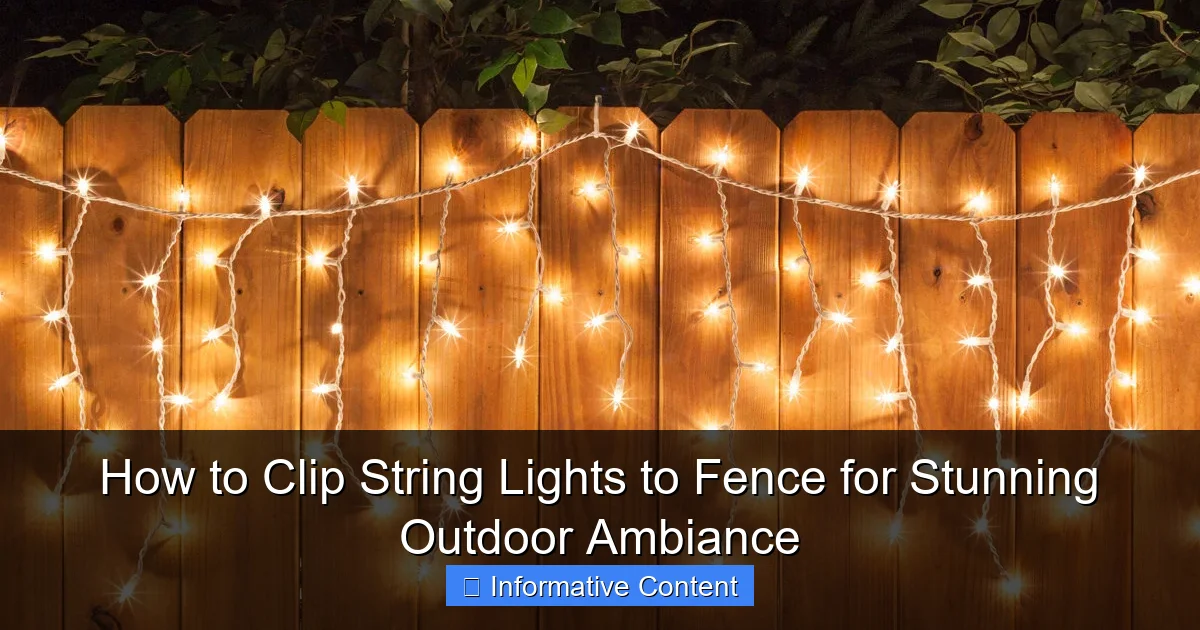
Why Clip String Lights to a Fence? The Magic of Outdoor Ambiance
Picture this: It’s a warm summer evening. You’re sipping lemonade on your patio, the air smells like freshly cut grass, and soft, golden lights twinkle along the edge of your backyard. The source? A simple fence, now transformed into a glowing frame for your outdoor oasis. Clipping string lights to a fence isn’t just about adding light—it’s about creating mood, defining space, and making your outdoor area feel cozy and inviting.
Whether you’re hosting a backyard BBQ, enjoying a quiet night with a book, or setting the scene for a romantic dinner under the stars, clip string lights to fence is one of the easiest and most effective ways to elevate your outdoor ambiance. And the best part? You don’t need to be an electrician or a DIY pro to pull it off. With just a few tools and a little creativity, you can turn your plain wooden or chain-link fence into a shimmering backdrop that wows guests and makes you smile every time you step outside.
Choosing the Right String Lights for Your Fence
Before you start clipping, you’ll want to pick the right kind of string lights. Not all lights are created equal, and the wrong choice can lead to flickering, sagging, or even safety hazards. Let’s break down what to look for.
Visual guide about clip string lights to fence
Image source: fenceanddecksupply.com
Types of String Lights: LED vs. Incandescent
LED string lights are the clear winner for most outdoor setups. They’re energy-efficient, last up to 25,000 hours, and don’t get hot—making them safe to touch and perfect for year-round use. They also come in warm white, cool white, multicolor, and even color-changing options. Plus, many are dimmable and compatible with smart plugs or timers.
Incandescent lights, on the other hand, give off a nostalgic, warm glow but use more energy, get hot, and burn out faster. They’re great for temporary events, but not ideal for long-term fence installations.
Pro tip: Look for IP44 or higher weather resistance—this means they can handle rain, wind, and dust. If you live in a humid or rainy climate, this is non-negotiable.
Bulb Shape and Spacing: What Works Best?
The shape of the bulb affects the mood. Globe (round) bulbs create a soft, diffused glow—perfect for a romantic or relaxed vibe. Mini lights (tiny bulbs) give a twinkly, starry effect, ideal for a magical or festive feel. Candles or flame-shaped bulbs add a rustic, cozy touch.
Spacing matters too. Lights spaced 2–3 inches apart offer full coverage without looking cluttered. If your fence is long, consider connectable strings so you can link multiple sets without needing extra outlets.
Length and Power Source: Planning for Success
Measure your fence first. You don’t want to end up with too few lights (awkward gaps) or too many (overwhelming or tangled). A good rule: add 10% extra length to account for corners, curves, or slight overhangs.
For power, consider whether you want plug-in or solar-powered lights. Plug-in gives you consistent brightness and more control (like timers), but you’ll need access to an outdoor outlet. Solar lights are eco-friendly and easy to install—no wires—but may dim in winter or on cloudy days. Some models have a backup USB charge option, which is a nice middle ground.
Tools and Materials You’ll Need to Clip String Lights to Fence
Now that you’ve picked your lights, let’s talk tools. The good news? Most of what you need is probably already in your garage or toolbox. Here’s a simple checklist to get you started.
Visual guide about clip string lights to fence
Image source: odditymall.com
Essential Tools for Installation
- Fence clips or hooks: These are game-changers. Unlike nails or staples, they’re removable and won’t damage your fence. Look for all-weather plastic or stainless steel clips that grip both the fence and the light wire.
- Measuring tape: Helps you plan spacing and avoid uneven lines.
- Scissors or wire cutters: For trimming zip ties or cutting excess cord (if using plug-in lights).
- Drill or screwdriver: Only if you’re using permanent hooks or eye screws (not needed if using clips).
- Ladder: For tall fences or reaching upper sections safely.
Bonus: A level can help keep your lights straight—especially important if you’re going for a clean, professional look.
Recommended Accessories for a Polished Look
- Zip ties: Great for securing extra cord or bundling wires behind the fence.
- Weatherproof outlet cover: Protects your outdoor plug from rain.
- Timer or smart plug: Automatically turns lights on at dusk and off at dawn. No more forgetting to switch them off!
- Extension cord (outdoor-rated): If your outlet is far from the fence, use a heavy-duty cord with a built-in surge protector.
Real-world example: I once installed lights on my 30-foot cedar fence using only plastic clips and a timer. It took about an hour, and I didn’t have to drill a single hole. The lights stayed put all summer—even during a thunderstorm—and came down easily in the fall with no damage to the wood.
Step-by-Step: How to Clip String Lights to Fence (With Tips)
Ready to get your hands dirty? Here’s a simple, foolproof method to clip string lights to fence—whether it’s wood, vinyl, or chain-link.
Step 1: Plan Your Layout
Before you start clipping, sketch a quick layout. Decide if you want:
- Straight line along the top: Classic and clean.
- Zig-zag or crisscross pattern: Adds visual interest and covers more surface area.
- Vertical drops or cascades: Great for creating a “curtain” effect.
Use painter’s tape or chalk to mark key points (corners, midpoints) so your lights stay aligned.
Step 2: Install Clips or Hooks
For wooden or vinyl fences, use plastic fence clips. Just snap them over the top rail or between boards. Space them every 12–18 inches for even support.
For chain-link fences, use looped S-hooks or zip ties through the mesh. Clip one end to the light wire and the other to the fence. No tools needed!
Tip: If you want a permanent setup, install eye screws every few feet. Just twist them into the wood, then hang the lights with small hooks or loops. This is great for year-round installations but avoid if you rent or plan to change styles often.
Step 3: Attach the Lights
Start at one end and work your way across. Hook the light wire into each clip—don’t stretch it tight. Leave a little slack (about 1–2 inches between clips) to prevent sagging in hot weather or when wind blows.
For zig-zag patterns, run the lights diagonally from one clip to another, then back. Use extra clips at each turn to keep the shape crisp.
Pro move: If you’re using multiple light strands, connect them first (if compatible), then hang the entire run. This avoids dangling connectors mid-fence.
Step 4: Secure Cords and Outlets
Bundle excess cord with zip ties and tuck it behind the fence or under a planter. Never let cords dangle—they can get caught in lawn mowers or become trip hazards.
Plug into an outdoor-rated outlet with a weatherproof cover. If you’re using a timer, set it to turn on 30 minutes before sunset and off at bedtime. I use a smart plug synced to my phone—I can turn the lights on from the couch, even if it’s raining!
Step 5: Test and Adjust
Turn on the lights and walk around. Look for:
- Sagging sections (add a clip or tighten the wire)
- Flickering bulbs (replace or check connections)
- Uneven spacing (reposition clips)
Small tweaks make a big difference. Don’t rush this step!
Creative Ideas and Design Tips for Maximum Impact
Now that you know how to clip string lights to fence, let’s talk style. A little creativity can turn your setup from “nice” to “neighborhood envy.”
Go Beyond the Top Rail: Unique Placement Ideas
- Wrap around posts: Coil lights around fence posts for a lantern effect.
- Create a “wall of light”: Run vertical strings from top to bottom, spaced evenly—like a glowing curtain.
- Highlight landscaping: Clip lights around flower beds or shrubs behind the fence to create depth.
- Frame a seating area: Use lights to outline a patio or pergola attached to the fence.
My neighbor once clipped lights in a heart shape over their back fence for an anniversary party. It was simple, sweet, and totally Instagram-worthy.
Color and Theme Pairings
- Warm white: Timeless, elegant. Pairs well with wooden furniture and greenery.
- Multicolor: Festive and fun. Great for birthdays or holidays.
- Blue or cool white: Modern and calming. Works well with contemporary decor.
- Flickering amber: Cozy and rustic. Perfect for fire pit areas.
For themed events, swap bulbs or add colored filters. I once used red and green mini lights for a holiday party, then switched to warm white for everyday use—same clips, different vibe.
Layering Lights for Depth
Don’t stop at one string. Try:
- Two rows: One along the top, one lower down for a “halo” effect.
- Mixed bulb types: Globe lights at the top, mini lights below.
- Backlighting: Place lights behind the fence (if you have space) to create a soft glow through the boards.
Layering adds dimension and makes your yard feel larger and more inviting.
Maintenance, Safety, and Long-Term Care
Good news: once your lights are up, they don’t need much upkeep. But a little care goes a long way in keeping them safe and looking great.
Seasonal Maintenance Tips
- Spring: Clean clips and check for rust or damage. Replace any burnt-out bulbs.
- Summer: Wipe down lights with a damp cloth if they get dusty. Check connections after storms.
- Fall: Remove leaves and debris that could trap moisture. Consider taking lights down if you live in a snowy area (or use all-weather models).
- Winter: If leaving lights up, inspect weekly for ice buildup or sagging. Use timers to limit use during freezing temps.
One winter, I left my lights up and came back to find a section sagging under ice. A quick clip added at the midpoint fixed it—no damage to the bulbs or wire.
Safety First: Avoiding Common Hazards
- Use GFCI outlets: These cut power if there’s a short circuit—essential for outdoor use.
- Don’t overload circuits: Check your lights’ wattage and stay under 80% of the circuit’s max load.
- Inspect wires: Look for fraying, exposed copper, or cracked insulation. Replace damaged sets.
- Keep cords off the ground: Use clips or hooks to lift wires above wet grass or puddles.
And please—never use nails or staples on electrical cords. It’s a fire hazard and can void warranties.
Storing Lights for Next Year
If you take them down, store them right:
- Coil loosely and wrap in paper or a cloth bag.
- Keep in a dry, cool place (basement, closet).
- Label the box with the bulb type and length for next time.
I use old pillowcases—no tangles, and they’re breathable.
Data Comparison: Popular Fence Light Clips (2024)
| Clip Type | Best For | Weather Resistance | Ease of Use | Price Range | Removable? |
|---|---|---|---|---|---|
| Plastic Snap Clips | Wood, vinyl | High (IP44+) | ★★★★★ | $8–$15 (pack of 20) | Yes |
| Stainless Steel Hooks | Wood, metal | Very High | ★★★★☆ | $12–$20 (pack of 10) | Yes |
| S-Hooks (Looped) | Chain-link | High | ★★★★★ | $5–$10 (pack of 30) | Yes |
| Eye Screws + Hooks | Permanent setups | Very High | ★★★☆☆ | $10–$18 (pack of 15) | No (semi-permanent) |
| Zip Ties (Outdoor) | Chain-link, wood | High | ★★★★☆ | $6–$12 (100 pcs) | No (cut to remove) |
This table helps you pick the right clip for your fence type and needs. For most people, plastic snap clips are the sweet spot—affordable, easy, and damage-free.
Final Thoughts: Light Up Your Life, One Clip at a Time
There’s something magical about stepping into a backyard that glows with soft, warm light. Clipping string lights to fence is more than a decor choice—it’s an invitation to slow down, breathe, and enjoy the moment. Whether you’re lighting up a quiet corner for stargazing or creating a vibrant party space, the process is simple, affordable, and totally customizable.
I’ve used this method for everything from summer barbecues to winter solstice gatherings. The best part? Every time I flip the switch, I feel a little spark of joy. And isn’t that what outdoor living is all about?
So grab your lights, pick your clips, and give it a try. Start small—maybe just one section of fence—and build from there. You’ll be amazed at how such a simple addition can transform your outdoor space into a personal retreat. After all, you don’t need a huge yard or a big budget to create stunning ambiance. Just a few well-placed lights, a little patience, and the courage to try.
Now go on—clip those lights, turn on the glow, and enjoy your new favorite place in the world: your backyard.
Frequently Asked Questions
How do I securely clip string lights to a fence without damaging it?
Use non-invasive clips like S-hooks, adhesive-backed clips, or zip ties designed for outdoor use. These methods hold lights firmly while protecting the fence surface from scratches or dents.
What type of clips work best for attaching string lights to a fence?
Opt for weather-resistant plastic or metal clips, such as gutter hooks, fence clips, or twist ties with rubber coating. These are ideal for gripping the fence and securing clip string lights to fence setups long-term.
Can I install string lights on a wooden vs. metal fence differently?
Yes—wooden fences work well with nails or hooks, while metal fences require magnetic clips or zip ties. Always choose a method that matches your fence material to avoid instability or damage.
How far apart should I space clips for even string light distribution?
Place clips every 12–18 inches to prevent sagging and ensure consistent spacing. For longer runs, measure the distance between bulbs and match your clip placement to the light pattern.
Are there battery-powered string lights that work well with fence clips?
Yes, many battery-powered LED string lights are lightweight and compatible with fence clips. They’re ideal for areas without outlets and simplify the clip string lights to fence process.
How do I hide clips for a cleaner look when installing string lights?
Use clear or color-matched clips, tuck them behind fence rails, or weave lights through decorative elements like lattice. This keeps the focus on the lights, not the hardware.

