Featured image for how to hang string lights covered patio
Image source: i.pinimg.com
Transform your covered patio into a stunning nighttime retreat by securely mounting string lights using weather-resistant hardware and strategic spacing for balanced illumination. This guide walks you through choosing the right lights, measuring your space, and safely installing them on beams, eaves, or tension wires—ensuring a professional look that lasts through the 2026 season and beyond. No more sagging or flickering—just flawless ambiance year-round.
“`html
How to Hang String Lights Covered Patio 2026 Ultimate Guide
Key Takeaways
- Plan your layout first: Sketch light placement to avoid gaps or overcrowding.
- Use sturdy anchors: Secure lights to beams, hooks, or tension wires for safety.
- Choose weatherproof lights: Opt for LED or outdoor-rated strings to last longer.
- Measure spacing accurately: Keep bulbs evenly spaced for a balanced, professional look.
- Test before finalizing: Check connections and brightness before permanent installation.
- Hide cords creatively: Use clips or conduit to keep wires tidy and hazard-free.
Why This Matters / Understanding the Problem
Imagine this: it’s a warm summer night, you’re sipping lemonade on your covered patio, and the soft glow of string lights wraps around you like a cozy hug. But then—*snap*—the lights droop, tangle, or worse, fall mid-dinner party. Sound familiar?
If you’ve ever struggled with how to hang string lights covered patio 2026 ultimate guide, you’re not alone. A covered patio offers shade and shelter, but it’s not always the easiest place to hang lights. The beams, rafters, or overhangs can be tricky, and without the right approach, your dreamy ambiance turns into a DIY disaster.
Whether you’re hosting a backyard BBQ, creating a romantic nook, or just want to enjoy your outdoor space after dark, the right lighting makes all the difference. This guide will walk you through a simple, reliable method to hang string lights that last—no professional help needed. And yes, it’s way easier than you think.
We’ll cover everything from tools to spacing, from safety to style, all while keeping your patio looking polished and your wallet happy. Let’s turn that covered space into your favorite room—outdoors.
What You Need
Before you start, let’s gather your gear. You don’t need a toolbox full of gadgets—just a few essentials. Here’s your quick checklist:
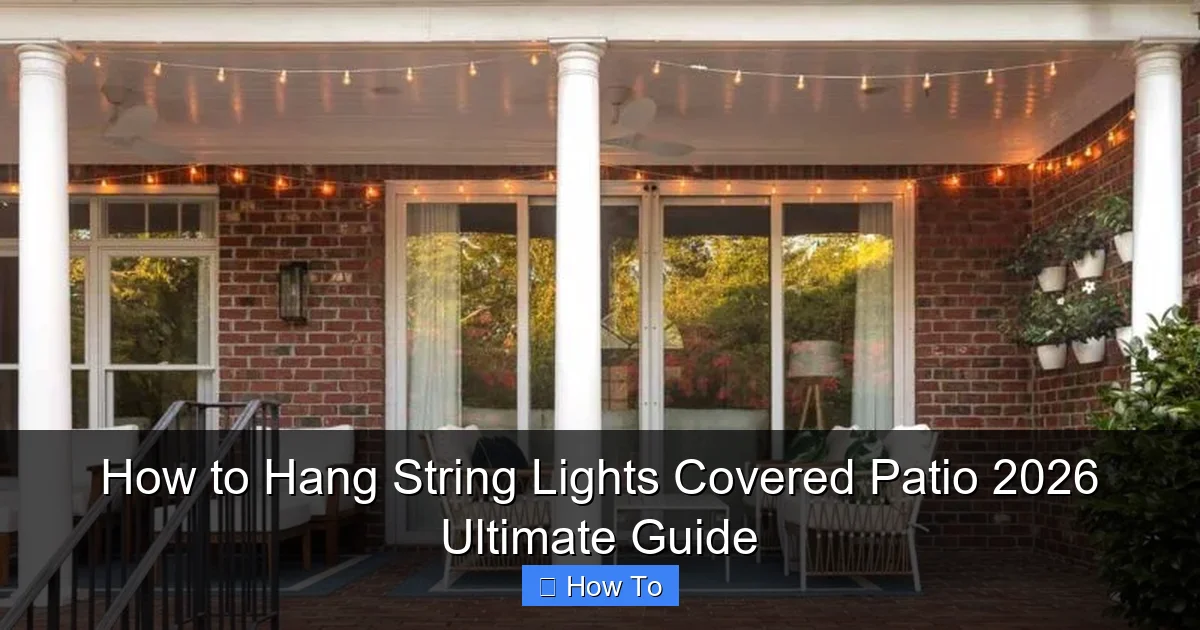
Visual guide about how to hang string lights covered patio
Image source: drivenbydecor.com
- String lights (LED for energy efficiency and safety)
- Measuring tape (a 25-foot roll works great)
- Drill with drill bits (for wood or metal, depending on your patio structure)
- Eye hooks or screw-in cup hooks (stainless steel or weather-resistant)
- Zip ties or outdoor-rated adhesive clips (for extra support or non-drill options)
- Extension cords (outdoor-rated) (check wattage compatibility)
- Step ladder (a sturdy one—safety first!)
- Level (optional but helpful) for straight lines
- Gloves (protect your hands from splinters or sharp edges)
Pro Tip: Buy 10–15% more lights than you think you need. You’ll thank yourself when you hit that awkward corner or need extra length for a plug.
Now, about the lights: choose outdoor-rated string lights with LED bulbs. They last longer, use less power, and won’t get hot. Look for IP44 or higher weatherproof ratings—especially if your patio has partial exposure to rain or humidity.
And don’t forget: if your patio has metal rafters, consider using magnetic clips or adhesive hooks to avoid drilling into steel. We’ll cover alternatives later.
Step-by-Step Guide to How to Hang String Lights Covered Patio 2026 Ultimate Guide
Step 1: Measure Your Space and Plan the Layout
Grab your measuring tape and walk around your covered patio. Measure the perimeter of the area where you want lights—this could be along the edges, across rafters, or in a zigzag pattern.
Sketch a quick diagram on paper or use your phone to map it out. Think about where you’ll plug in the lights. You’ll want to start near an outdoor outlet or GFCI-protected extension cord.
For even coverage, plan for lights every 6–8 inches along the path. If you’re going for a “canopy” effect (lights crisscrossing overhead), space them 2–3 feet apart. This step is crucial for how to hang string lights covered patio 2026 ultimate guide—it prevents overbuying or running short.
Warning: Don’t just eyeball it. I once skipped measuring and ended up with 2 feet of lights dangling off the end. Not cute.
Step 2: Choose Your Mounting Method
Now, decide how you’ll attach the lights. Your options depend on your patio’s structure:
- Wooden beams or rafters? Use screw-in cup hooks or eye hooks. They’re strong, removable, and won’t damage the wood.
- Metal roof or steel supports? Try magnetic clips or heavy-duty adhesive hooks (rated for outdoor use).
- Brick or stucco? Use masonry anchors with hooks—just be careful not to crack the surface.
- No drilling allowed? Use zip ties around beams or adhesive light clips (like 3M Outdoor Light Clips).
I’ve used all of these. For my cedar pergola, eye hooks worked perfectly. But on my neighbor’s metal gazebo, magnetic clips saved the day—no holes, no fuss.
Remember: the goal is secure but removable so you can take down the lights in winter or rearrange them later.
Step 3: Install the Hooks or Clips
Time to get your hands dirty. Start at one end—preferably near your power source.
Use your drill to install hooks every 6–8 feet. For a straight line along a beam, use a level to keep them aligned. For a zigzag or crisscross pattern, mark your spots with a pencil first.
If you’re using adhesive clips, clean the surface with isopropyl alcohol first. Dirt and dust ruin stickiness. Press each clip firmly for 10–15 seconds, then wait 24 hours before hanging lights (yes, really).
For zip ties: loop them around beams and tighten just enough to hold the lights—don’t over-tighten or you’ll damage the wires.
Pro Tip: Install hooks in pairs (one at the start, one at the end) for each string. This keeps tension even and prevents sagging.
Step 4: Test the Lights Before Hanging
Before you climb the ladder again, plug in the lights and make sure they work. Check every bulb—LEDs rarely burn out, but sometimes one goes out in transit.
If you’re using multiple strands, test them together. Most outdoor lights are “end-to-end” connectable. Just don’t exceed the manufacturer’s wattage limit (usually 210 watts max for 120V circuits).
Why do this now? Because nothing’s worse than hanging 50 feet of lights only to find one strand is dead. Save yourself the headache.
Step 5: Hang the Lights
Now for the fun part. Start at the power source and work outward.
Loop the first bulb socket (or the “end cap” if it’s a plug-in style) onto the first hook. Let the string hang naturally—don’t pull it too tight. A little slack prevents strain on the wires.
Move along, securing each bulb socket to its hook or clip. For longer spans, use a zip tie or secondary clip in the middle to prevent sagging. I like to add one every 10–12 feet for support.
If you’re doing a crisscross pattern, tie the strings to hooks at each intersection. Use small zip ties or twist ties to keep them tidy. Avoid knots—they’re hard to undo later.
For a “floating” look, hang lights 6–8 inches below the roof or rafters. This softens the light and hides the wires.
Common Mistake: Pulling lights too tight. It stresses the wires, causes sagging over time, and looks unnatural. Let them drape.
Step 6: Secure the Power Cord
The power cord is often the weakest point. Don’t let it dangle or rub against sharp edges.
Use zip ties or adhesive clips to guide the cord along a beam or wall. Keep it away from foot traffic and water sources.
If you’re using an extension cord, make sure it’s rated for outdoor use and has a GFCI plug. This protects against shocks—especially important in damp areas.
Pro tip: coil excess cord and store it in a small waterproof container (like a plastic bin) near the outlet. Keeps it tidy and safe.
Step 7: Adjust and Fine-Tune
Step back and look at your work. Are the lights even? Do they drape nicely? Is there any sagging?
Use zip ties or extra clips to tweak the tension. If a section looks too low, add a support clip in the middle. Too high? Loosen a hook slightly.
For a “starry” effect, gently twist the bulbs so they face different directions. For a clean look, keep them aligned.
And don’t forget to check from inside your house. How do they look from the kitchen window? This is your chance to fix any awkward angles before it’s too late.
Pro Tips & Common Mistakes to Avoid
After hanging string lights on three patios (and fixing two disasters), I’ve learned a few things the hard way. Here’s what I wish I knew earlier:
- Use a timer or smart plug. Lights on at 7 PM, off at 11 PM? A $20 smart plug does the job. Saves energy and keeps your routine hands-free.
- Label your strands. If you use multiple sets, label each plug with tape. Makes troubleshooting way easier.
- Don’t mix brands. Different brands have different voltages and connectors. Stick to one type per project.
- Check for clearance. Make sure lights don’t block doors, fans, or AC units. I once hung lights right in front of my patio fan—lights went flying on high speed.
- Think about bulb spacing. Tight spacing (every 6 inches) = cozy glow. Wider spacing (every 12 inches) = boho, open feel. Choose based on your vibe.
Warning: Avoid using indoor string lights outdoors. They’re not weatherproof and can short-circuit in rain or humidity. I learned this after a thunderstorm fried my first set. Oops.
Another big one: don’t overload your circuit. If you’re adding lights to an existing outlet with a TV, fan, and speakers, you might trip the breaker. Use a circuit checker app or a simple outlet tester to see what’s already running.
And if you’re renting or don’t want to drill? Adhesive clips and tension rods are your friends. I’ve used 3M Outdoor Clips on stucco and wood with zero damage. Just let them cure for 24 hours.
For a modern twist, try fairy lights in glass jars hung from hooks. Adds texture and diffuses the light beautifully.
FAQs About How to Hang String Lights Covered Patio 2026 Ultimate Guide
Can I leave string lights up all year?
You can, but I don’t recommend it. Even outdoor-rated lights degrade over time—especially in direct sun or freezing temps. I take mine down in winter and store them in a dry, dark place. They last 3–5 years that way. If you want year-round lights, use permanent LED strip lights instead.
How do I hang lights without drilling?
Great question! Use adhesive light clips (like 3M Outdoor Light Clips), zip ties around beams, or magnetic clips on metal. I’ve also used tension rods between walls to create a “floating” frame. Just make sure the surface is clean and dry for best adhesion.
What if my patio has no beams?
No problem. Use outdoor poles (like shepherd’s hooks or metal stakes) at the corners. Or attach hooks to the fascia board under the roof edge. If you have a pergola, wrap lights around the posts. Get creative—just keep them secure and out of walkways.
How many strands can I connect together?
Check the manufacturer’s label. Most outdoor LED strings can connect up to 210 watts. That’s usually 3–5 strands, depending on bulb count and wattage. Never exceed this—overloading can melt wires or trip your breaker.
Do I need a permit to hang lights?
For temporary, plug-in lights? No. But if you’re wiring into your electrical panel or installing permanent fixtures, check with your local building code. In most areas, DIY electrical work requires a permit and inspection. When in doubt, call an electrician.
What’s the best way to store lights in winter?
Coil them loosely (don’t wrap tightly—it stresses the wires) and store in a plastic bin with silica gel packs to prevent moisture. Keep them off concrete floors to avoid condensation. Label the bin so you know what’s inside.
How do I fix a burned-out bulb?
Most LED string lights have shunted sockets
Hanging string lights on a covered patio isn’t just about ambiance—it’s about creating a space where you love to be. Whether it’s for a quiet night with a book or a lively dinner party, the right lighting transforms your outdoor area into an extension of your home. With this how to hang string lights covered patio 2026 ultimate guide, you’ve got everything you need: simple steps, smart tools, and real-world tips to avoid the pitfalls. Remember: measure first, test before you hang, and don’t over-tighten. A little planning goes a long way. And if you mess up? No worries. I’ve had to rehang lights more times than I’d like to admit. The key is to enjoy the process—and the result. So grab your tools, turn on some music, and get to work. Your dream patio is just a few hooks away. And when those lights glow softly overhead, you’ll know it was worth every step. Now go make some memories under the lights. “`Final Thoughts

