Featured image for how to hang strings light with a concrete patio
Image source: i.pinimg.com
Hanging string lights on a concrete patio in 2026 is easier than ever with modern, damage-free solutions like heavy-duty adhesive hooks, tension rods, and ground-mounted poles designed for hard surfaces. No drilling required—just plan your layout, use weather-resistant hardware, and secure lights with UV-protected clips for a stunning, long-lasting glow all year round.
“`html
How to Hang Strings Light with a Concrete Patio in 2026
Key Takeaways
- Plan layout first: Map light placement to avoid uneven spacing or overloading circuits.
- Use concrete anchors: Secure mounts with masonry screws or epoxy for long-lasting hold.
- Drill pilot holes: Prevent cracking by pre-drilling before installing hooks or anchors.
- Weatherproof connections: Protect outlets and wires with covers for year-round safety.
- Test before finalizing: Check lights work before securing all fixtures permanently.
- Use tension cables: Support long runs with guide wires to prevent sagging.
- Follow local codes: Ensure outdoor electrical work meets 2026 safety regulations.
Why This Matters / Understanding the Problem
Let’s be real: nothing beats the glow of string lights on a warm summer night. Whether you’re hosting a backyard BBQ, enjoying a quiet evening with your partner, or just want to jazz up your outdoor space, those twinkling lights make everything feel magical. But here’s the catch—when you have a concrete patio, the usual tricks (like hammering nails into wood or using zip ties on pergolas) don’t work.
Concrete is tough. It doesn’t forgive mistakes. And if you’re like me, you’ve probably stared at your bare patio, wondering, “How do I hang strings light with a concrete patio in 2026 without turning my backyard into a construction zone?”
The good news? It’s absolutely doable. With the right tools, a little patience, and a few clever tricks, you can create a dreamy, Instagram-worthy setup that lasts for years. In this guide, I’ll walk you through how to hang strings light with a concrete patio in 2026—step by step, from planning to plugging in the last bulb.
We’ll cover everything: from choosing the right hardware to avoiding rookie mistakes that could cost you time, money, or even a cracked patio slab. No fluff, no jargon—just real talk from someone who’s been there, drilled that, and learned from it.
What You Need
Before we dive in, let’s talk gear. You don’t need a full toolkit, but having the right items makes this job way easier. Here’s your quick checklist:
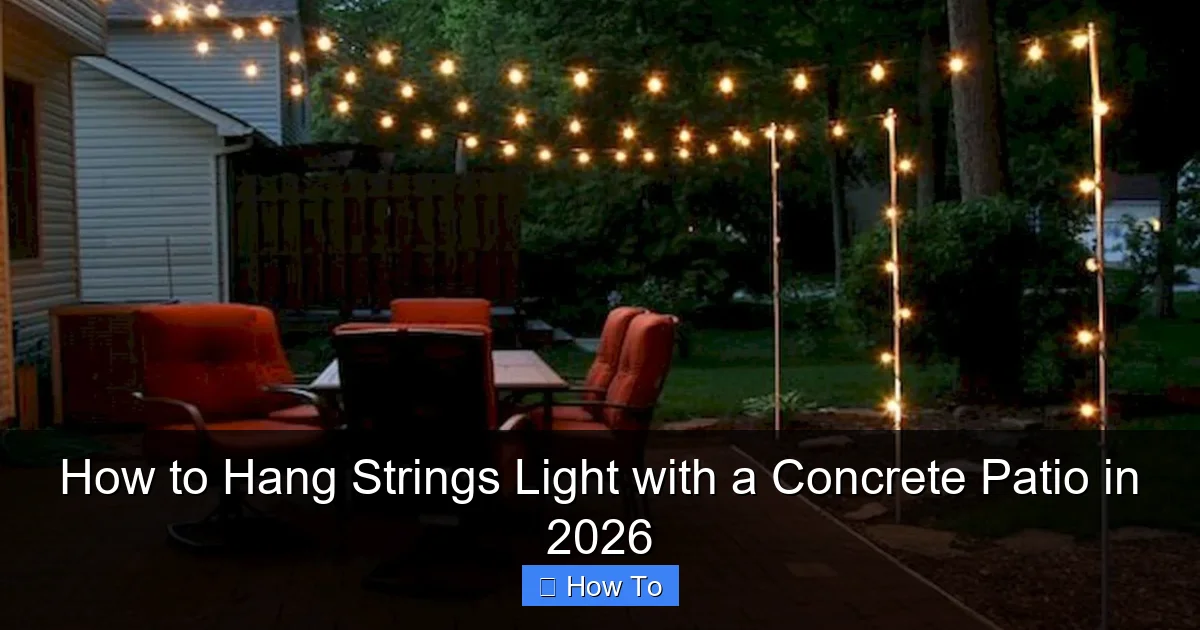
Visual guide about how to hang strings light with a concrete patio
Image source: i.pinimg.com
- String lights (LED, outdoor-rated, and preferably with a timer or remote)
- Concrete anchors and screws (plastic or metal anchors with matching screws, like toggle bolts or concrete screws)
- Masonry drill bit (carbide-tipped, size-matched to your anchors)
- Power drill (cordless or corded, with a hammer function)
- Measuring tape and pencil (for marking anchor points)
- Level (to keep lines straight)
- Wire clips or hooks (plastic or metal, rated for outdoor use)
- Extension cords (if needed) (outdoor-rated, with proper GFCI protection)
- Optional: adhesive hooks, zip ties, or tension wire (for non-permanent options)
- Safety gear (goggles, dust mask, gloves)
Pro tip: If you’re renting or just testing the look, consider adhesive-backed hooks or weighted bases for a no-drill solution. But for long-term setups, anchors are your best bet. We’ll explore both options in the steps below.
Step-by-Step Guide to How to Hang Strings Light with a Concrete Patio in 2026
Step 1: Plan Your Layout (Measure Twice, Drill Once)
Before you even pick up a drill, sketch out your design. Are you going for a canopy? A zigzag? A simple straight line across the patio?
Grab your measuring tape and mark where you want the lights to go. Use painter’s tape or chalk to visualize the path. Think about:
- Height: Lights should hang 7–9 feet above ground to avoid head bumps.
- Spacing: Anchors every 3–4 feet for straight runs; closer for curves.
- Power source: Map the shortest, safest path to an outdoor outlet. Avoid tripping hazards.
When I first tried this, I skipped the measuring and ended up with a lopsided “U” shape that looked like a drunk spider built it. Lesson learned: measure twice, drill once applies to concrete just as much as wood.
This step is crucial in how to hang strings light with a concrete patio in 2026—because once you drill, there’s no “oops, let’s move it.”
Step 2: Choose Your Mounting Method (Permanent vs. Temporary)
Now, decide: do you want a permanent setup or something you can take down?
- Permanent (anchors & screws): Best for year-round lighting. Uses concrete anchors for a rock-solid hold.
- Temporary (adhesive hooks, zip ties, tension wire): Great for renters or seasonal use. No drilling required.
For this guide, we’ll focus on the permanent method—because if you’re investing in outdoor lighting, you want it to last. But I’ll share temporary hacks in the tips section.
If you go permanent, pick anchors based on weight:
- Light string lights (under 10 lbs): Plastic anchors (e.g., Tapcon screws)
- Heavy lights or wind-prone areas: Metal anchors (e.g., toggle bolts)
Warning: Never use drywall anchors on concrete. They’ll pop out the second a breeze hits. Trust me—I tried. The lights fell, the dog barked, and I had to start over.
Step 3: Mark and Drill Anchor Points
Now the fun begins. Grab your pencil and mark each anchor spot on the concrete. Use a level to keep lines straight—especially if you’re going for a grid or canopy.
Next, grab your masonry drill bit (match the diameter to your anchor). Most anchors need a 3/16” or 1/4” bit. Insert it into your drill and set it to hammer mode—this helps the bit chew through concrete.
Here’s how to drill:
- Start at a 90-degree angle. Apply steady, even pressure—no jerking.
- Drill slowly. Let the bit do the work. It should take 10–20 seconds per hole.
- Stop when the bit reaches the anchor’s depth (usually 1.5–2 inches).
Pro tip: Drill a test hole in a hidden spot first. Concrete varies—some slabs are harder than others. If it’s too hard, switch to a higher-quality carbide bit.
After drilling, blow out the dust with your mouth or a can of compressed air. This ensures the anchor sits snugly.
This is where how to hang strings light with a concrete patio in 2026 gets real. Take your time. Rushing leads to cracked concrete or misaligned holes.
Step 4: Insert Anchors and Secure Hooks
Now, tap the anchor into the hole with a hammer until it’s flush with the surface. Then, screw in your hook or mounting bracket.
For plastic anchors:
- Insert the anchor, then screw in the hook. The anchor expands inside the hole, gripping the concrete.
For metal anchors (like toggle bolts):
- Insert the bolt, then tighten until the toggle opens behind the concrete. These are stronger but trickier.
Use your drill’s screwdriver setting to tighten—don’t overdo it. Over-tightening can strip the anchor or crack the concrete.
Pro tip: If you’re installing multiple hooks, use a spacer block (like a 2×4 cut to 3 feet) to keep them evenly spaced. Saves time and keeps your lines looking professional.
Step 5: Hang the String Lights
Now for the best part—hanging the lights!
Start at the power source. Drape the first end of the string lights over the hook. Use a wire clip or zip tie to secure it. Don’t just loop it—this prevents stress on the plug and reduces sagging.
Work your way across, attaching the lights every 3–4 feet. For curves or corners, use extra clips to guide the path. If the lights sag, add a center anchor or use a tension wire (a thin cable run between anchors, with lights clipped to it).
For a canopy effect:
- Install anchors in a grid pattern (e.g., 4×4 or 5×5).
- Run the lights in a crisscross pattern, securing each intersection with a clip.
Pro tip: Leave a little slack between hooks. This gives the lights a gentle curve and hides any minor height differences.
When you reach the end, secure the final plug with a clip or loop it around a hook. Never leave it dangling—wind can pull it loose.
Step 6: Test and Adjust
Plug in the lights and step back. Do they look even? Are there dark spots or sagging areas?
- Too much sag? Add a center anchor or tighten the tension.
- Uneven glow? Check for broken bulbs or loose connections.
- Glare in eyes? Lower the lights or angle them downward.
If you’re using multiple strands, connect them with a waterproof connector or extension cord. Make sure all connections are off the ground and protected from rain.
Safety note: Always use GFCI outlets or a weatherproof cover for outdoor power. Water and electricity don’t mix—especially on concrete, which conducts moisture.
Step 7: Weatherproof and Maintain
Concrete patios are exposed to rain, sun, and temperature swings. To keep your lights shining:
- Seal connections: Use silicone sealant on plugs and connectors.
- Trim nearby plants: Vines or leaves can damage wires.
- Clean annually: Wipe bulbs with a damp cloth to remove dust and grime.
- Store properly: If you take them down, coil lights loosely in a dry container to prevent tangling.
For permanent setups, consider burying a conduit (plastic pipe) under the patio edge to hide extension cords. It’s a weekend project, but worth it for a clean look.
Pro Tips & Common Mistakes to Avoid
After years of trial and error, here’s what I wish I’d known before starting:
- Don’t skip the level: A 1/4” misalignment over 10 feet looks like a crooked smile. Use a level on every third hook.
- Buy extra anchors: You’ll lose a few in the dust or strip one. Always have backups.
- Use LED lights: They last longer, use less power, and won’t melt snow if you leave them on in winter.
- Check local codes: Some areas require permits for permanent outdoor wiring. A quick call to your city office saves headaches.
- For renters or temporary setups: Try adhesive hooks (like 3M Outdoor Strips) or weighted bases. Or, run a tension wire between two trees or posts near the patio.
- Windproof your lights: In windy areas, use heavier-duty anchors and add extra clips. Or, hang lights under an overhang.
Common mistake: Drilling too close to the edge. Concrete chips easily at the edges. Keep holes at least 2 inches from the patio border.
And here’s a personal story: I once used regular screws instead of concrete anchors. Big mistake. After a storm, the lights came crashing down. The screws had wiggled loose. Lesson: always use the right anchor for the job.
FAQs About How to Hang Strings Light with a Concrete Patio in 2026
Can I hang string lights on concrete without drilling?
Absolutely! For a no-drill option, try:
- Adhesive hooks (rated for outdoor use, like 3M Outdoor Strips)
- Weighted bases (sandbags or concrete blocks with hooks)
- Tension wire (run between nearby trees, fences, or posts)
These are great for renters or seasonal setups. But they’re not as secure as anchors—especially in windy areas.
What’s the best type of anchor for concrete?
For most string lights, plastic sleeve anchors (like Tapcon screws) work great. They’re affordable, easy to install, and hold up to 10–15 lbs per anchor. For heavier lights or high-wind areas, use toggle bolts or epoxy anchors.
How far apart should anchors be?
For straight runs, every 3–4 feet. For curves or canopies, every 2–3 feet. The closer the anchors, the less the lights will sag. Use a spacer block to keep them evenly spaced.
Can I run string lights across a concrete roof?
Yes, but only if the roof is designed for outdoor use (e.g., a flat concrete roof with proper drainage). Use the same anchors and hooks. But never drill into a sloped or waterproofed roof—it could cause leaks. For sloped roofs, use weighted bases or adhesive hooks on the fascia.
Do I need a special drill for concrete?
A hammer drill is ideal, but a regular drill with a hammer function works too. The key is using a carbide-tipped masonry bit. Regular drill bits will overheat and dull quickly.
How do I hide extension cords on a concrete patio?
- Bury a conduit under the patio edge (dig a 6” trench, lay a plastic pipe, and cover it).
- Use cord covers (rubber or plastic channels that snap over the cord).
- Route along a wall and cover with a decorative planter or bench.
Can I leave string lights up year-round?
Yes, if they’re outdoor-rated and properly weatherproofed. Use LED lights (they handle cold better) and seal all connections. But check bulbs annually—moisture can cause shorts.
Final Thoughts
Hanging string lights on a concrete patio might seem daunting, but it’s totally doable. The key to how to hang strings light with a concrete patio in 2026 is patience and the right tools. Start small—try a simple straight line—then expand to canopies or grids as you gain confidence.
Remember: it’s not just about the lights. It’s about creating a space where memories happen. That first night you flip the switch and see your patio transformed? Pure magic.
So grab your drill, sketch your design, and get started. And if you hit a snag (like a cracked anchor or a sagging line), don’t stress. We’ve all been there. Just adjust, rehang, and enjoy the glow.
Happy lighting—and here’s to many cozy nights under the stars. 🌟
“`

