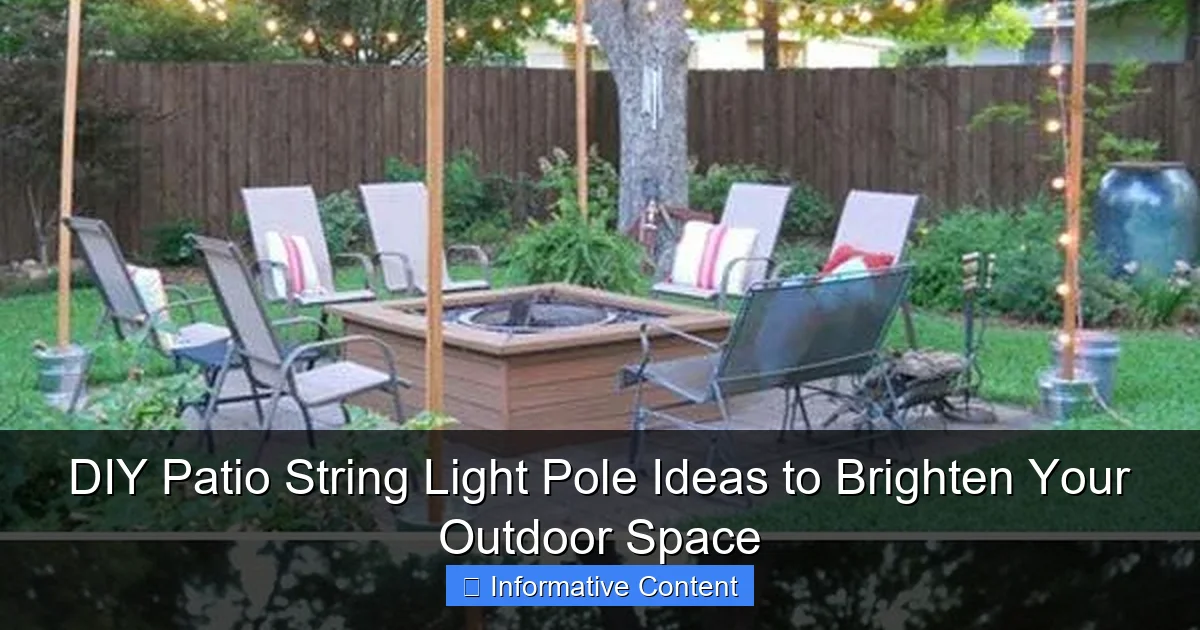
Featured image for patio string light pole diy
Image source: i.pinimg.com
Transform your outdoor space with creative, budget-friendly DIY patio string light pole ideas that add charm and ambiance without the need for expensive installations. From repurposed wood and metal pipes to freestanding tripods and hanging pergolas, these easy-to-build solutions let you customize height, style, and layout for a stunning nighttime glow.
Key Takeaways
- Choose durable materials: Opt for weather-resistant metals or treated wood for long-lasting poles.
- Plan pole height: Aim for 7–8 feet to safely string lights without sagging.
- Anchor securely: Use concrete footings or ground sleeves to stabilize freestanding poles.
- Repurpose creatively: Transform old pipes, trees, or fences into unique light supports.
- Add dimmers or timers: Enhance ambiance and energy efficiency with smart controls.
- Space poles evenly: Place 10–15 feet apart for balanced light distribution.
📑 Table of Contents
- Transform Your Backyard with DIY Patio String Light Poles
- Why DIY Patio String Light Poles Are a Game-Changer
- Choosing the Right Materials for Your DIY Light Poles
- Step-by-Step Guide: Building a Classic Wooden Light Pole
- Creative Design Ideas to Match Your Style
- Pro Tips for Long-Lasting, Weather-Resistant Setup
- Comparison Table: DIY vs. Commercial Light Poles
- Final Thoughts: Light Up Your Life—One Pole at a Time
Transform Your Backyard with DIY Patio String Light Poles
There’s something magical about the glow of string lights twinkling above a patio on a warm summer night. Whether you’re hosting a dinner party, enjoying a quiet evening with a book, or simply unwinding after a long day, the right lighting can completely transform your outdoor space. But if you don’t have a pergola, roofline, or existing structure to hang lights from, don’t worry—there’s a simple and stylish solution: DIY patio string light poles.
I discovered this trick a few years ago when my husband and I wanted to upgrade our backyard for summer gatherings. Our patio had no overhead structure, and commercial light poles were either too expensive or didn’t match our aesthetic. After a weekend of trial, error, and a few trips to the hardware store, we built our own poles—and now, our backyard feels like a cozy, inviting retreat. Since then, I’ve helped friends, neighbors, and even local cafes create their own versions. The best part? You don’t need to be a DIY expert to pull it off. With a few basic tools and a little creativity, you can build beautiful, functional patio string light pole DIY solutions that suit your space and style.
Why DIY Patio String Light Poles Are a Game-Changer
If you’ve ever tried to string lights across an open patio, you know how frustrating it can be to find anchor points. Trees might be too far apart, fences too low, or you may not want to damage walls with hooks. DIY light poles solve these problems by giving you full control over placement, height, and design. They’re not just practical—they’re also a chance to add personality to your outdoor decor.
Visual guide about patio string light pole diy
Image source: i2.wp.com
Benefits of Building Your Own Light Poles
- Customizable height and spacing: No more guessing where lights will hang. You decide the ideal height (usually 8–10 feet) and distance between poles for even illumination.
- No structural damage: Unlike drilling into walls or eaves, poles sit on the ground or in weighted bases, leaving your home untouched.
- Portable and reusable: Need to rearrange for a party or move them seasonally? No problem. Most DIY designs are easy to disassemble and store.
- Cost-effective: A single commercial light pole can cost $50–$150. With DIY, you can build a sturdy pole for $20–$40 each.
- Creative freedom: From rustic wood to sleek metal, the materials and finishes are entirely up to you.
Real-Life Example: The “Backyard Bistro” Setup
Last summer, my neighbor, Sarah, wanted to create a romantic corner in her small backyard. She had a 12×12 ft patio with no overhead features. We built two 9-foot cedar poles using 2×2 lumber, anchored them with concrete-filled buckets, and strung vintage Edison bulbs in a zig-zag pattern. The result? A cozy, Parisian-style bistro vibe that she now uses for date nights and book clubs. She spent under $60 total and said it was the best backyard upgrade she’s ever made.
Choosing the Right Materials for Your DIY Light Poles
The materials you choose will affect not just the look of your poles, but also their durability, cost, and ease of installation. Let’s break down the most popular options and what to consider for each.
Wood: Warm, Rustic, and Budget-Friendly
Wood is a top choice for patio string light pole DIY projects because it’s easy to work with, looks natural, and blends well with gardens and patios. Common types include:
- Cedar: Naturally rot-resistant, lightweight, and has a beautiful grain. Slightly more expensive but worth it for longevity.
- Pine or Spruce: Affordable and easy to find. Seal with exterior-grade paint or stain to protect from moisture.
- Reclaimed wood: Eco-friendly and full of character. Just make sure it’s structurally sound and free of nails.
Tip: Use 2×2 or 2×4 lumber for strength. A 2×2 is sufficient for most setups unless you’re spanning a large area or using heavy lights.
Metal: Sleek, Modern, and Extremely Durable
For a more industrial or contemporary look, metal poles are excellent. Options include:
- Galvanized steel conduit: Affordable, weatherproof, and easy to cut with a hacksaw. Looks great with Edison bulbs.
- Black iron pipe: Has a vintage, urban feel. Can rust over time unless painted with rust-inhibiting paint.
- Aluminum: Lightweight and corrosion-resistant. More expensive but ideal for coastal areas.
Tip: If using metal, sand sharp edges and apply a clear coat or paint to prevent rust and improve appearance.
Concrete, Stone, or Weighted Bases: Stability Matters
No matter what material you choose, your poles need a stable base. Here are three reliable options:
- Concrete-filled buckets: Mix quick-setting concrete in a 5-gallon bucket, insert the pole, and let it cure for 24–48 hours. Easy to move and hides the base.
- Landscape pavers or stone bases: Use a 12-inch diameter stone or paver with a hole in the center. Slide the pole through and secure with epoxy or sand.
- Weighted planters: Fill large planters (at least 18 inches wide) with sand, gravel, or concrete. Add plants on top for a decorative touch.
Pro tip: For high-wind areas, use at least 30 lbs of weight per pole. A 5-gallon bucket of concrete weighs about 50 lbs—perfect for stability.
Step-by-Step Guide: Building a Classic Wooden Light Pole
Let’s walk through a simple, beginner-friendly project using cedar wood and concrete-filled buckets. This design is sturdy, attractive, and can be completed in a single weekend.
Materials and Tools You’ll Need
- 2×2 cedar lumber, 10 feet long (1 per pole)
- Two 5-gallon buckets with lids
- Quick-setting concrete mix (1 bag per bucket)
- Water
- Exterior wood stain or paint
- Sandpaper (120 and 220 grit)
- Drill with 1/8-inch drill bit
- Wood screws (2.5-inch, exterior-grade)
- Measuring tape, level, pencil
- Work gloves and safety goggles
Step 1: Prepare the Wood
Sand the cedar pole thoroughly with 120-grit paper to remove splinters, then finish with 220-grit for a smooth surface. Wipe off dust and apply 2–3 coats of exterior stain or paint. Let dry completely (usually 24 hours). This step is crucial—it protects the wood from rain, sun, and insects.
Step 2: Set the Base
Place the bucket where you want the pole. Pour in the concrete mix, following package instructions. Add water gradually and stir until it reaches a thick, peanut-butter-like consistency. Insert the pole into the center, using a level to ensure it’s perfectly vertical. Let cure for at least 24 hours. Pro tip: Place a small stone or pebble under one side of the bucket to create a slight tilt for drainage.
Step 3: Add a Top Cap (Optional)
To prevent water from pooling on top, attach a small wood cap or metal finial. Cut a 3-inch square of cedar, drill a hole slightly larger than the pole, and secure with a screw. This also gives your pole a finished look.
Step 4: Install Hooks or Eye Bolts
About 6 inches from the top, drill a small hole and screw in a stainless steel eye bolt or cup hook. This is where you’ll attach the string lights. For a zig-zag pattern, install two eye bolts on opposite sides.
Step 5: String the Lights
Use outdoor-rated string lights (LEDs are best for energy efficiency). Attach S-hooks or carabiners to the eye bolts, then drape the lights across to another pole or anchor point. Use a ladder and a helper for safety. Test the lights before finalizing the setup.
Common Mistakes to Avoid
- Not sealing the wood: Unsealed cedar will warp and gray quickly. Always stain or paint.
- Skipping the level: A crooked pole looks unprofessional. Check with a level during and after setting.
- Using indoor lights: Outdoor lights have thicker, weather-resistant cords and waterproof sockets.
Creative Design Ideas to Match Your Style
Your patio string light pole DIY project doesn’t have to be plain. With a few tweaks, you can create a look that complements your home and outdoor decor. Here are some inspiring ideas:
Rustic Farmhouse: Reclaimed Wood + Mason Jars
Use reclaimed barn wood for the poles. Attach mason jars with wire loops to the poles and place tea lights or fairy lights inside. The warm glow adds charm and nostalgia. Paint the jars white or leave them clear for a vintage feel.
Modern Minimalist: Black Metal + Linear Layout
Use black iron pipe poles (available at hardware stores) with clean lines. Space them evenly and hang lights in straight lines, not zig-zag. Add geometric planters at the base for a sleek, urban look.
Bohemian Vibe: Driftwood + Tassels
For a beachy, free-spirited style, use large pieces of driftwood as poles. Secure them in heavy stone bases. Hang lights with colorful tassels, beads, or macramé hangers between poles. Mix in lanterns and floor cushions for a full boho effect.
Industrial Chic: Exposed Pipes + Cage Lights
Use galvanized steel conduit poles and vintage-style cage lights. Add pipe flanges at the base for extra stability. This style works great in modern patios or urban rooftops.
Romantic Garden: Twisted Willow + Soft Bulbs
If you have a garden patio, consider using live or dried willow branches. Weave them into a teepee shape and anchor them with stakes. String soft white or warm yellow bulbs through the branches for a magical, fairy-tale glow.
Pro Tips for Long-Lasting, Weather-Resistant Setup
You’ve built your poles and strung the lights—now how do you keep them looking great year after year? Here are expert tips to extend the life of your DIY setup.
Weatherproofing Your Poles
- Re-stain wood annually: Even exterior-grade stain wears off. Reapply every spring for protection.
- Seal metal joints: Use silicone caulk around eye bolts or caps to prevent water from seeping in.
- Elevate from ground: Place a small plastic cap or rubber pad under the pole to reduce moisture contact.
Light Maintenance and Safety
- Use GFCI outlets: Outdoor electrical connections should always be protected by a Ground Fault Circuit Interrupter to prevent shocks.
- Inspect cords regularly: Look for fraying, exposed wires, or loose sockets. Replace damaged lights immediately.
- Use timers or smart plugs: Automate your lights to turn on at dusk and off at bedtime. Saves energy and adds convenience.
Seasonal Storage
While poles can stay outside year-round (if properly built), consider removing string lights during winter in harsh climates. Store them in a dry place to prevent cord damage. For poles, cover the tops with plastic caps or store indoors if you live in an area with heavy snow or ice.
Wind and Storm Protection
High winds can topple poorly anchored poles. In storm-prone areas:
- Use deeper concrete bases (up to 18 inches below ground).
- Add guy wires (thin steel cables) from the top of the pole to stakes in the ground.
- Lower lights during storms or take down temporarily.
Comparison Table: DIY vs. Commercial Light Poles
| Feature | DIY Wooden Pole | DIY Metal Pole | Commercial Pole |
|---|---|---|---|
| Cost per pole | $20–$40 | $25–$50 | $50–$150 |
| Installation time | 4–6 hours (including drying) | 3–5 hours | 1–2 hours |
| Customization | High (shape, finish, height) | Medium (limited to pipe sizes) | Low (pre-designed) |
| Durability | 5–10 years (with maintenance) | 8–12 years | 10+ years |
| Portability | High (easy to move) | Medium (heavy base) | Low (often fixed in place) |
| Skill level | Beginner to intermediate | Beginner | Beginner (plug-and-play) |
As you can see, DIY poles offer the best balance of cost, customization, and portability. While commercial options are faster to install, they lack the personal touch and often cost more. For most homeowners, the patio string light pole DIY route is the smarter long-term investment.
Final Thoughts: Light Up Your Life—One Pole at a Time
There’s nothing quite like the soft, inviting glow of string lights on a summer evening. And with a few simple tools and a weekend of effort, you can create that magic in your own backyard. DIY patio string light poles aren’t just about function—they’re about creating a space where memories happen. Whether you’re sipping coffee at sunrise, hosting a barbecue, or stargazing with loved ones, the right lighting sets the mood.
From rustic cedar poles to sleek metal designs, the possibilities are endless. And the best part? You’re not limited by existing structures or high prices. You’re in control. So grab your drill, pick your materials, and start building. Your dream patio is just a few poles away. And when your friends ask, “Where did you get those beautiful lights?” you can smile and say, “I made them myself.”
Remember: a great outdoor space doesn’t have to be expensive or complicated. It just has to feel like home. And with a little creativity and a few DIY patio string light poles, you can turn any backyard into a glowing, welcoming oasis—no contractor required.
Frequently Asked Questions
What materials do I need for a DIY patio string light pole?
You’ll need sturdy poles (wood, metal, or PVC), concrete for stability, hooks or eye bolts, and outdoor-rated string lights. Choose weather-resistant materials to ensure longevity in your outdoor space.
How tall should my DIY patio string light pole be?
Most poles range from 7 to 10 feet tall, depending on your patio size and lighting needs. Taller poles work better for larger areas, while shorter ones suit cozy spaces.
Can I use existing structures instead of building a DIY patio string light pole?
Yes! Fences, trees, pergolas, or railings can serve as anchor points for your string lights. This saves time and materials while still creating a charming ambiance.
How do I secure the poles to withstand wind and weather?
Bury poles at least 18–24 inches deep in concrete for stability. Add diagonal braces or ground stakes for extra support in windy areas.
Are there creative ways to style DIY patio string light poles?
Absolutely! Wrap poles with ivy, paint them in bold colors, or add decorative finials. For a rustic look, use reclaimed wood or galvanized metal poles.
Can I install solar-powered lights on my DIY patio string light pole?
Yes, solar string lights are a great eco-friendly option. Just ensure the solar panel gets direct sunlight, and attach it near the top of the pole for optimal charging.

