Featured image for putting string lights on patio
Image source: lovelyetc.com
Transform your patio into a mesmerizing retreat by strategically hanging string lights to enhance ambiance and functionality. Use secure mounting points like railings, walls, or poles, and choose weather-resistant, LED string lights for a safe, energy-efficient glow that lasts all night. Simple techniques—like zigzag patterns or canopy draping—create instant magic for any outdoor gathering.
Key Takeaways
- Plan your layout first: Sketch light placement to avoid overhangs or dark spots.
- Use weatherproof lights: Choose outdoor-rated strings for safety and longevity.
- Secure with durable hooks: Install hooks every 2-3 feet for even tension.
- Hide cords strategically: Tuck wires under railings or furniture for a clean look.
- Mix light styles: Combine string lights with lanterns for layered ambiance.
- Time your installation: Hang lights at sunset to visualize the glow instantly.
📑 Table of Contents
- Why String Lights Can Transform Your Patio Experience
- Choosing the Right String Lights for Your Patio
- Planning Your Layout: Mapping the Perfect Glow
- Installation Methods: How to Put String Lights on Patio (Without Stress)
- Power, Safety, and Maintenance: Keeping Your Lights Shining
- Creative Ideas and Pro Tips for a Show-Stopping Patio
- Final Thoughts: Your Patio, Your Sanctuary
Why String Lights Can Transform Your Patio Experience
Remember that first warm evening of summer when you finally stepped outside, barefoot on the patio, with a cool drink in hand? The sun was setting, the air was just right, and for a fleeting moment, everything felt peaceful. But then—darkness. The overhead floodlight kicked on, harsh and uninviting, and the magic was gone. Sound familiar? That’s when I realized: lighting isn’t just functional—it’s emotional. And nothing transforms a patio from “meh” to magical like a well-placed string of lights.
I’ve spent years experimenting with different ways to put string lights on patio spaces, from simple backyard setups to full outdoor dining areas. What I’ve learned is that the right lighting doesn’t just brighten the space—it changes the mood, invites conversation, and makes your outdoor area feel like an extension of your home. Whether you’re hosting a dinner party, reading a book at dusk, or just enjoying a quiet night under the stars, string lights can create a soft, ambient glow that makes every moment feel special. The good news? You don’t need an electrician or a big budget to get it right. With a little planning and some practical know-how, you can turn your patio into a cozy, inviting retreat—no matter the size.
Choosing the Right String Lights for Your Patio
Before you start hanging anything, it’s important to pick the right kind of lights. Not all string lights are created equal, and choosing poorly can lead to frustration, poor performance, or even safety issues. Let’s break down the key factors to consider so you can find the perfect fit for your space.
LED vs. Incandescent: Which Is Better?
When I first started, I assumed all string lights were the same. Boy, was I wrong. The biggest decision you’ll make is between LED and incandescent bulbs. Here’s the lowdown:
- LED lights are energy-efficient, last up to 25,000 hours (that’s over 8 years if you use them 8 hours a night!), and stay cool to the touch. They’re perfect for long-term use and work great with dimmers and smart controls.
- Incandescent lights have that classic warm glow—think vintage café lights—but they use more power, burn hotter, and last only about 1,000–2,000 hours. They’re nostalgic and charming, but not ideal for all-night use or high-traffic areas.
For most patios, I recommend LED string lights. They’re safer, more cost-effective over time, and available in warm white (2700K–3000K) to mimic that cozy incandescent feel. If you love the look of vintage Edison bulbs, go for LED Edison-style—they give you the best of both worlds.
Bulb Shape, Size, and Spacing
Not all bulbs are shaped the same, and this affects both aesthetics and functionality:
- Edison bulbs (teardrop-shaped with visible filaments) are stylish and cast a soft, warm light—great for dining areas or conversation zones.
- Globe bulbs (round and smooth) offer a more modern, even glow—ideal for wrapping around railings or creating a canopy.
- Mini lights (tiny bulbs on thin wire) are perfect for wrapping trees, railings, or outlining architectural features.
Spacing matters too. Lights spaced 4–6 inches apart give a full, glowing effect. If they’re spaced 12+ inches apart, you’ll see more “dots” than a continuous glow—better for accent lighting than ambiance. I once used widely spaced lights on a pergola and ended up with a “starry night” look, which was pretty, but not what I wanted for a dinner party. Lesson learned: match bulb spacing to your lighting goal.
Weather Resistance and Durability
Your patio lights will face rain, wind, UV rays, and temperature swings. Make sure they’re rated for outdoor use (look for “UL Listed” or “ETL Listed”) and check the IP (Ingress Protection) rating. For patios, an IP44 or higher is ideal—it means the lights can handle splashes and dust. If your patio is exposed to heavy rain or snow, aim for IP65 or higher.
Also, check the cord material. Thick, rubber-coated cords last longer than thin plastic ones. And if you live in a windy area, avoid lights with flimsy sockets or loose bulbs—they’ll rattle and burn out faster.
Planning Your Layout: Mapping the Perfect Glow
Now that you’ve chosen your lights, it’s time to plan where they’ll go. A good layout isn’t just about aesthetics—it’s about function, safety, and avoiding last-minute “why didn’t I think of that?” moments.
Assess Your Patio’s Structure and Features
Start by walking around your patio at night (or use a flashlight if it’s dark). Identify:
- Natural anchor points: posts, railings, trees, eaves, pergolas, or awnings.
- Obstacles: furniture, planters, stairs, or anything that could block or tangle the lights.
- Power sources: outlets, extension cords, or solar panel locations.
I once tried to run lights across a 20-foot open space with no support—ended up with sagging wires and a tangled mess. Now, I always sketch a simple diagram first. It doesn’t have to be fancy—just mark anchor points and the path the lights will take.
Create Zones for Different Activities
Think about how you use your patio. Do you eat outside? Lounge? Grill? Each activity benefits from different lighting. Here’s how I divide my space:
- Dining area: Overhead canopy or crisscrossed strings (like a café) for even, task lighting.
- Conversation nook: Lights wrapped around railings or posts for ambient glow.
- Grill station: Bright, focused lights (but not blinding)—LED spotlights or under-cabinet lighting work well.
- Walkways: Low-level lights along edges for safety.
One of my favorite tricks? Layering. Use string lights as your base layer, then add solar path lights or LED candles for depth. It creates a more dynamic, inviting space.
Measure, Measure, Measure
Nothing kills the vibe faster than running out of lights halfway through. Before buying, measure:
- The distance between each anchor point (e.g., from post to post).
- The total length of the path you’re lighting.
- The distance from the power source to the first light strand.
Always buy 10–15% more than you think you need. Extra length gives you room for slack, curves, or future changes. And if you’re using multiple strands, make sure they’re connectable (check the packaging) so you can daisy-chain them without extra outlets.
Installation Methods: How to Put String Lights on Patio (Without Stress)
Now comes the fun part—actually installing the lights. The method you choose depends on your patio’s structure, but here are the most effective techniques, tested and tweaked over years of trial and error.
Using Existing Structures: Posts, Railings, and Eaves
If your patio has posts (like a pergola or deck railing), you’re in luck. They’re the easiest and most secure anchor points. Here’s how I do it:
- Start at the power source. Plug in the first strand and run it along the railing or post.
- Use zip ties or outdoor-rated adhesive hooks to secure the lights every 12–18 inches. Don’t overtighten—you want to avoid crushing the wires.
- For a crisscross or canopy effect, run lights from one post to another in a zigzag pattern. I use eye hooks screwed into the top of the posts to create anchor points. Space them 2–3 feet apart for a balanced look.
Pro tip: Use clear zip ties or white-coated hooks—they blend in better than black or metal ones.
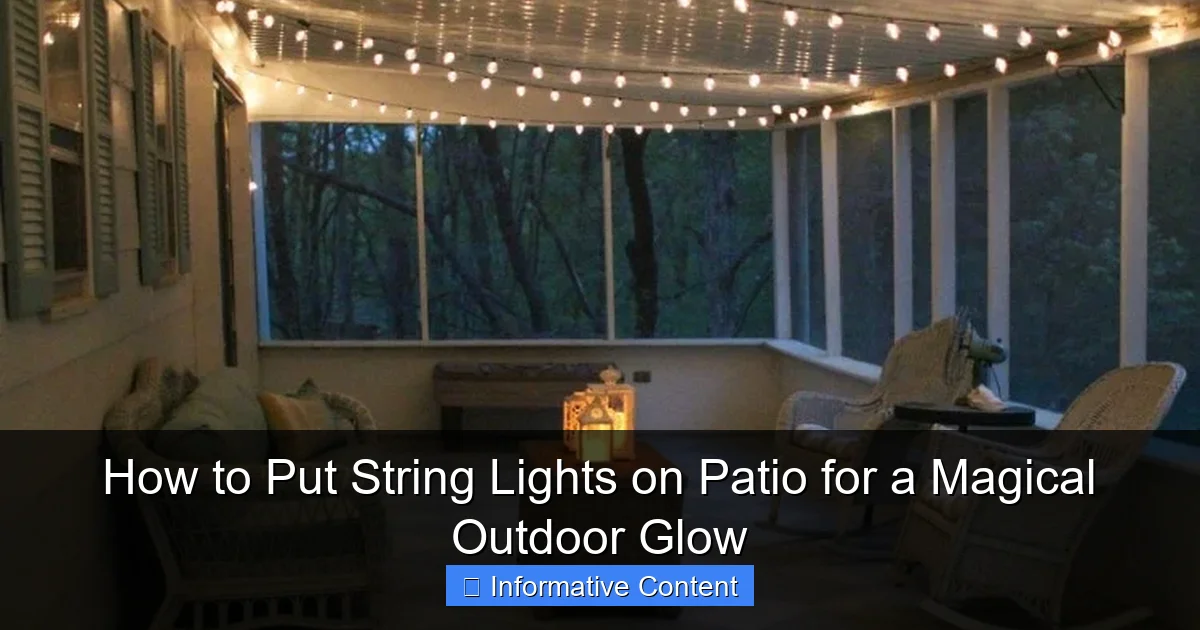
Creating a Canopy or “Tent” Effect
This is my go-to for dining areas. It mimics a European café and casts a soft, even glow. Here’s how:
- Install eye hooks or cup hooks at the corners of your patio (or on a pergola).
- Run a support wire (like galvanized steel cable) between the hooks. This acts as a backbone for the lights.
- Attach the string lights to the cable using small S-hooks or zip ties. Space them 12–24 inches apart for a full canopy.
I once used fishing line instead of steel cable—big mistake. It sagged in the heat and looked messy. Steel cable is cheap, strong, and invisible from the ground.
Hanging Lights on Open Patios (No Posts? No Problem)
No posts or roof? No worries. You can still create a magical glow:
- Install ground-mounted poles: Use PVC pipes or metal stakes (like those for tomato cages) driven into the ground. Paint them to match your patio and attach hooks at the top.
- Use shepherd’s hooks: These garden stakes work great for small patios. I use 3–4 hooks in a line to create a “light fence” along a seating area.
- Attach to trees: If you have trees nearby, run lights up the trunk and out to the branches. Use tree-safe zip ties or fishing line—avoid nails or screws that damage the bark.
One summer, I used a combination of shepherd’s hooks and tree-mounted lights to create a “light tunnel” leading to my patio. It was a hit with guests—and my kids still talk about it!
Securing Lights on Railings, Fences, and Walls
For railings or low walls, adhesive hooks are a lifesaver. I like the 3M Command Outdoor Hooks—they hold up to 2 lbs, are weather-resistant, and leave no residue. Just press them on, let them cure for 24 hours, then hang your lights.
If you’re attaching to brick or stucco, use plastic anchors and screw hooks. Pre-drill a small hole, insert the anchor, then screw in the hook. It’s sturdy and won’t damage the surface.
Power, Safety, and Maintenance: Keeping Your Lights Shining
Great lighting is only as good as its power source and upkeep. Let’s cover the essentials to keep your setup safe, reliable, and long-lasting.
Power Sources: Outlets, Extension Cords, and Solar
Most string lights need a power outlet, but that doesn’t mean you need to run an extension cord across the yard. Here are your options:
- Outdoor outlets: Use weatherproof outlet covers to protect against rain. If you don’t have one, consider installing a GFCI outlet—it’s a one-time cost but worth it for safety.
- Extension cords: Use outdoor-rated, grounded cords (look for “SJTW” on the label). Never run cords under rugs or furniture—they can overheat. Instead, use cord covers or run them along walls.
- Solar-powered lights: Great for areas without outlets. They charge during the day and turn on automatically at dusk. Just make sure they get 6+ hours of direct sunlight.
I once used a regular indoor cord outside—within a week, it cracked from UV exposure. Now, I only use outdoor-rated cords, even for short-term setups.
Safety First: Avoiding Hazards
Outdoor lighting can be risky if not installed properly. Keep these safety tips in mind:
- Never use damaged cords or frayed wires.
- Don’t overload circuits—check the wattage of your lights and make sure your outlet can handle it.
- Keep lights away from water features (unless they’re submersible).
- Use UL-certified timers or smart plugs to turn lights on/off automatically. This prevents overheating and saves energy.
And please—no nails in wood. They can damage the structure and create fire hazards. Use hooks, ties, or adhesive mounts instead.
Maintenance Tips for Long-Term Glow
Your lights will last longer if you take care of them. Here’s my seasonal maintenance routine:
- Spring: Inspect all strands for damage, clean dust and debris, and test each bulb.
- Summer: Check for sagging wires or loose hooks. Tighten as needed.
- Fall: Remove and store lights if you live in a snowy area. For year-round use, cover the plug connections with weatherproof caps.
- Winter: If leaving lights up, use outdoor-rated, cold-weather lights (rated for -20°F or lower).
I keep a small repair kit with spare bulbs, zip ties, and electrical tape. It’s saved me more than once when a bulb burned out mid-party!
Creative Ideas and Pro Tips for a Show-Stopping Patio
Now that you’ve got the basics down, let’s get creative. These ideas will take your patio from “nice” to “wow.”
Mix and Match Lighting Layers
Don’t rely on string lights alone. Combine them with:
- Fairy lights in glass jars for table centerpieces.
- Solar path lights along walkways.
- LED candles in lanterns for soft, flicker-free light.
- Uplighting for trees or architectural features.
One of my favorite combos: string lights overhead, solar lights on the ground, and LED candles on the table. It feels like a scene from a movie.
Play with Patterns and Shapes
Instead of straight lines, try:
- Crisscross (like a net) for a canopy.
- Swag (draped in gentle curves) for a romantic feel.
- Geometric (squares or diamonds) for a modern look.
I once created a “light chandelier” by hanging a circular frame from the pergola and wrapping lights around it. It became the centerpiece of every party.
Use Color and Smart Controls
White lights are classic, but don’t be afraid to experiment:
- Warm white (2700K–3000K) for cozy, inviting glow.
- Cool white (4000K–5000K) for a modern, bright look.
- Color-changing LEDs for holidays or themed parties.
And if you’re tech-savvy, consider smart string lights that connect to your phone. You can set schedules, adjust brightness, or even sync them to music. I use mine to turn on at sunset—no more fumbling for switches.
| Lighting Style | Best For | Installation Difficulty | Estimated Cost |
|---|---|---|---|
| Crisscross Canopy | Dining areas, pergolas | Medium | $50–$100 |
| Railings & Posts | Small patios, decks | Easy | $20–$60 |
| Tree & Ground Poles | Open patios, gardens | Medium | $40–$80 |
| Solar String Lights | No outlets, eco-friendly | Easy | $30–$70 |
Final Thoughts: Your Patio, Your Sanctuary
Putting string lights on your patio isn’t just about adding light—it’s about creating a feeling. It’s about that moment when you step outside after a long day and feel your shoulders drop. It’s about the laughter of friends around a table, the quiet hum of conversation, the way the light dances on your wine glass at sunset.
You don’t need a huge budget or a professional installer. With the right lights, a little planning, and a few smart tricks, you can turn your patio into a personal sanctuary. Whether you’re going for cozy, romantic, modern, or whimsical, the key is to make it yours. Start small. Try one strand this weekend. See how it feels. Then add more. Experiment. Make mistakes. And most of all—enjoy the glow.
Because at the end of the day, a well-lit patio isn’t just about the lights. It’s about the life you live in the spaces between them.
Frequently Asked Questions
How do I hang string lights on a patio without drilling holes?
Use adhesive hooks, tension rods, or freestanding poles to secure your lights without damaging surfaces. This method works well for renters or temporary setups, especially when using lightweight LED string lights.
What’s the best way to put string lights on a patio with a roof?
For covered patios, attach hooks or clips to the ceiling beams or eaves, then drape the lights in zigzag or parallel patterns. Ensure the lights are rated for semi-outdoor use if exposed to humidity.
How far apart should I space the hooks when installing patio string lights?
Space hooks 2-3 feet apart for even support, adjusting based on the weight of your lights and desired sag. Over-tightening can strain wires, while too much slack may look messy.
Can I leave string lights on my patio year-round?
Only if they’re rated for outdoor use and weatherproof (look for IP65 or higher). Even then, periodic checks for frayed wires or water damage are recommended for safety.
How do I power string lights on a large patio without nearby outlets?
Use outdoor-rated extension cords, solar-powered lights, or battery-operated sets for hard-to-reach areas. For permanent setups, consider installing a GFCI outlet with a weatherproof cover.
What are creative ways to put string lights on a patio for maximum ambiance?
Try wrapping lights around pillars, hanging them in a canopy, or weaving them through plants for a layered glow. Mixing globe and fairy lights adds depth and visual interest to your patio.

