
Featured image for how to fix led christmas light 3 strings
Image source: diyable.com
Diagnose and fix LED Christmas light issues across 3 strings in minutes by first checking for loose bulbs, damaged sockets, or faulty fuses. Use a plug-in light tester to quickly identify dead sections and swap in known-working bulbs to isolate failures—no wire cutting or soldering needed. With simple tools and systematic testing, restore your holiday display fast and safely.
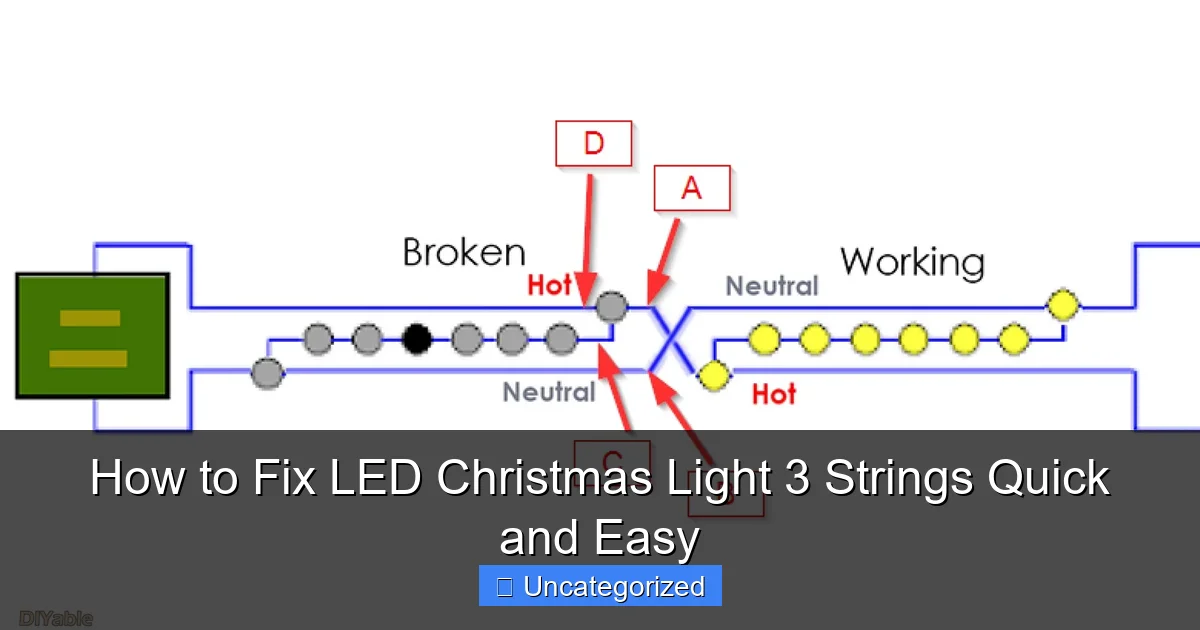
How to Fix LED Christmas Light 3 Strings Quick and Easy
Key Takeaways
- Inspect bulbs first: Check for loose or burnt-out bulbs causing string failures.
- Test the fuse: Replace faulty fuses in the plug to restore power.
- Use a voltage tester: Identify dead sections by testing along the wire.
- Swap with a known-good string: Isolate issues by testing connections with working lights.
- Secure all connections: Ensure plugs and in-line connectors are snug and dry.
- Replace damaged strings: Cut and wire-nut functional sections if repair is impractical.
Why This Matters / Understanding the Problem
Every holiday season, millions of homes light up with festive cheer—until one string of LED Christmas lights goes dark. You’ve got three strings connected, but only two are glowing. Frustrating, right? Instead of tossing them out, you can learn how to fix LED Christmas light 3 strings quick and easy with a few simple tools and some detective work.
Unlike old incandescent bulbs, LED lights are more energy-efficient and last longer, but they’re also more complex. A single bad bulb, loose connection, or faulty fuse can take down an entire string or even multiple connected strands. The good news? Most issues are fixable at home without needing an electrician.
Whether your lights are blinking erratically, half-lit, or completely dead, this guide will help you troubleshoot and repair them efficiently. We’ll walk you through diagnosing the problem, replacing faulty parts, and testing your setup—all while keeping safety in mind. With the right approach, you’ll save money, reduce waste, and keep your holiday decor shining bright.
Understanding how to fix LED Christmas light 3 strings quick and easy means you won’t have to buy new lights every year. It also helps you avoid the stress of last-minute shopping when the big day is just around the corner. Let’s get into the details and make your lights work like new again.
What You Need
Before diving in, gather the right tools and materials. You don’t need a full workshop—just a few essentials that most people already have at home. Here’s a quick list to get you started.
Visual guide about how to fix led christmas light 3 strings
Image source: diyable.com
- LED Christmas light repair kit (includes replacement bulbs, fuses, and a bulb tester) – highly recommended
- Small flathead and Phillips screwdrivers – for opening fuse covers and adjusting connections
- Needle-nose pliers – useful for gripping small parts and removing fuses
- Multimeter (digital voltmeter) – optional but helpful for advanced troubleshooting
- Replacement LED bulbs – match your light type (e.g., mini, C7, C9, or specialty shapes)
- Extra fuses – usually 3A or 5A; check your light string’s rating
- Electrical tape or heat shrink tubing – for securing loose wires
- Scissors or wire cutters – only if you need to trim damaged sections
- Flashlight – helps see small details in dark areas
- Workbench or clean flat surface – gives you space to spread out and avoid tangles
<
You can find LED Christmas light repair kits online or at hardware stores. They cost $10–$20 and often include everything you need. If you don’t have a multimeter, that’s okay—most repairs can be done using the included bulb tester and visual inspection.
Pro tip: Always keep a spare kit in your holiday storage bin. That way, when next year’s lights fail, you’ll be ready to fix LED Christmas light 3 strings quick and easy without running to the store.
Step-by-Step Guide to How to Fix LED Christmas Light 3 Strings Quick and Easy
Now that you’re prepared, let’s get into the action. This methodical process will help you identify and resolve the issue without guesswork. Follow each step carefully, and don’t skip ahead—especially when dealing with electricity.
Step 1: Disconnect and Inspect the Setup
First things first: unplug all three strings from the power source. Safety is your top priority. Even if the lights appear off, there could still be voltage running through them.
Lay the strings out on a flat surface. Untangle them gently to avoid damaging wires. Look for visible damage—frayed cords, bent sockets, melted plastic, or broken bulbs. Sometimes, the problem is as simple as a kinked wire or a loose bulb.
Check how the strings are connected. Are they daisy-chained (one after another)? Or are they plugged into a power strip with a built-in controller? Knowing the configuration helps you trace the flow of electricity.
Use your flashlight to examine the plug ends and the last bulb of each string. Look for corrosion, discoloration, or bent prongs. If the male plug (the one with prongs) looks burnt, that could be the culprit.
Pro Tip: Take a photo of the setup before disconnecting anything. This helps you remember how the strings were arranged and where each one plugs in.
Step 2: Test Each String Individually
Don’t assume the problem is in the middle string just because it’s dark. The issue could be anywhere—even in the first or last one. To isolate the problem, test each string separately.
Plug in the first string alone. Does it light up? If yes, great—it’s working. If not, it might be the source of the issue. Repeat this for the second and third strings.
Here’s a common scenario: The first string works, the second doesn’t, and the third is dark. That suggests the second string is faulty. But sometimes, a bad bulb in the third string can cause a cascade failure. That’s why individual testing is essential.
If only one string fails, you can focus your repair efforts there. If all three are dead, the problem is likely at the power source or the first connection point.
When testing, watch for flickering, dim lights, or sections that don’t light. These clues help narrow down the cause—loose connections, bad bulbs, or internal wire damage.
Warning: Never leave lights plugged in unattended during testing. If you notice smoke, a burning smell, or sparks, unplug immediately.
Step 3: Use the Bulb Tester (or Multimeter)
Most LED Christmas light repair kits come with a bulb tester—a small handheld device with a metal probe and an LED indicator. It’s one of the most useful tools for fixing LED Christmas light 3 strings quick and easy.
Start by removing one bulb from the non-working string. Insert the tester’s probe into the socket where the bulb was. The tester sends a small current through the circuit to see if the wiring is intact.
If the tester lights up, the socket and wiring are functional. If it doesn’t, there’s a break in the circuit—either a bad socket, a cut wire, or a dead section.
Move down the string, testing each socket one by one. When you reach a socket where the tester fails to light, you’ve found the problem zone. This could be a single bad bulb, a loose connection, or a damaged wire.
If you have a multimeter, set it to continuity mode. Touch one probe to the metal contact inside the socket and the other to the corresponding wire (if accessible). A beep means the circuit is complete; no beep means it’s broken.
For strings with shunts (a small bypass wire inside the socket), the tester may still show power even with a dead bulb. That’s normal—shunts keep the rest of the string lit if one bulb fails. But if multiple bulbs are out, the shunt might be damaged.
Pro Tip: Label the bulbs or sockets as you test them. Use a piece of tape or a marker to avoid confusion later.
Step 4: Check and Replace Fuses
Most LED light strings have replaceable fuses located in the plug end. These tiny fuses protect the lights from power surges and prevent fires. If a fuse blows, the entire string—or all connected strings—will go dark.
Locate the fuse cover on the plug (usually a small sliding door). Use a flathead screwdriver to open it. You’ll see two small glass or ceramic fuses inside, typically 3A or 5A.
Remove the fuses and inspect them. A blown fuse will have a broken wire inside or look blackened. Replace both fuses with new ones of the same amperage. Never use a higher-rated fuse—this can damage the lights or create a fire hazard.
After replacing the fuses, plug the string back in. If it lights up, you’ve solved the problem. If not, the issue lies elsewhere—likely in the bulbs or wiring.
Note: Some strings have fuses only on the first plug (the one that goes into the wall). If you’re using three connected strings, check the first plug’s fuses, even if the failure appears in the second or third string.
Warning: Don’t touch the metal parts of the fuses with your fingers. Oils from your skin can weaken them over time. Use pliers or a cloth to handle them.
Step 5: Replace Faulty Bulbs
Now that you’ve checked the wiring and fuses, it’s time to look at the bulbs. Even though LEDs last longer than incandescent bulbs, they can still burn out—especially if they’re exposed to moisture or power surges.
Start at the beginning of the string and remove each bulb. Look for:
- Darkened or blackened plastic
- Cracked lenses or broken bases
- Loose or wobbly connections
- Signs of water damage or corrosion
If a bulb looks damaged, replace it with a matching one from your kit. Make sure the voltage and base type (mini, C7, etc.) are the same. Mismatched bulbs can cause flickering or prevent the string from lighting.
Insert the new bulb firmly into the socket. Wiggle it slightly to ensure good contact. Then, plug the string in and see if it lights up.
For strings with shunts, replacing one bad bulb might fix the entire string. But if multiple bulbs are out, replace all the suspect ones. Sometimes, a single dead bulb can overload the circuit and cause others to fail.
If the string still doesn’t work, the issue might be in the socket itself—not the bulb. We’ll cover socket repairs in the next step.
Pro Tip: Keep a log of which bulbs you replace. If the same position fails every year, it could indicate a weak socket or wiring issue.
Step 6: Inspect and Repair Sockets
Sometimes, the bulb is fine, but the socket isn’t making proper contact. This can happen due to corrosion, bent contacts, or physical damage.
Use your flashlight to look inside the socket. The metal contacts should be straight and clean. If they’re bent, use needle-nose pliers to gently straighten them. Be careful—too much pressure can break the socket.
If the contacts are corroded (look for green or white crust), clean them with a cotton swab dipped in rubbing alcohol. Let them dry completely before reinserting the bulb.
For sockets that feel loose or wobbly, you can reinforce them with a small dab of hot glue or electrical tape. This helps keep the bulb in place and ensures a solid connection.
In rare cases, the socket’s internal wiring may be damaged. If you see frayed wires or exposed metal, you’ll need to cut out that section and splice in a new socket. This requires basic soldering skills and a replacement socket.
To do this:
- Cut the wire just before and after the damaged socket.
- Strip about 1/2 inch of insulation from each end.
- Twist the wires together with the new socket’s leads.
- Solder the connections and cover them with heat shrink tubing or electrical tape.
This is a more advanced fix, but it’s doable with practice. If you’re not comfortable with soldering, consider replacing the entire string.
Warning: Never work on a socket while the string is plugged in. Even a small spark can be dangerous.
Step 7: Reconnect and Test All 3 Strings
Once you’ve repaired the faulty string, it’s time to reconnect all three and test the full setup. This is the final check to ensure everything works together.
Start by plugging the first string into the wall outlet. Then connect the second string to the first, and the third to the second. Make sure each connection is secure—no loose plugs or exposed wires.
Turn on the power and watch the lights. All three strings should light up evenly, with no flickering or dim spots. If they do, congratulations! You’ve successfully fixed LED Christmas light 3 strings quick and easy.
If only one string lights up, go back and double-check the connections. Sometimes, a plug isn’t fully seated, or a fuse was missed. Re-test each string individually again.
For strings with a controller (e.g., flashing or color-changing), make sure the controller is set to the right mode. A faulty controller can mimic a wiring problem.
Finally, run the lights for at least 30 minutes to ensure they stay on. This helps catch intermittent issues that might not appear right away.
Pro Tip: Use outdoor-rated extension cords and power strips if your lights are outside. Indoor-rated cords can overheat and pose a fire risk.
Pro Tips & Common Mistakes to Avoid
Even with the right tools, mistakes happen. Here are some expert tips and pitfalls to watch out for when learning how to fix LED Christmas light 3 strings quick and easy.
- Don’t skip the fuse check. Many people overlook this simple fix. A blown fuse is often the reason all three strings go dark.
- Match bulb types exactly. Using a different voltage or base type can damage the string. Always check the label on the original bulb.
- Work in a well-lit area. Poor lighting makes it hard to see small details like bent contacts or frayed wires.
- Don’t force bulbs into sockets. LEDs have delicate pins. If a bulb won’t go in, check the socket for blockage or damage.
- Avoid overloading the circuit. Plugging too many strings into one outlet can trip breakers or blow fuses. Most circuits support 3–4 max.
- Label your strings. Use colored tags or tape to identify each one. This makes troubleshooting easier next year.
- Store lights properly. Coil them loosely and keep them in a dry place. Tight knots can damage wires over time.
One common mistake is assuming the middle string is always the problem. In reality, the first or last string can fail and affect the whole line. Always test each one separately.
Another issue: using a multimeter incorrectly. If you’re not familiar with how to use one, stick to the bulb tester. A wrong setting can give false readings or damage the lights.
Lastly, don’t rush. Take your time. Rushing leads to missed details and repeated repairs. Fixing LED Christmas light 3 strings quick and easy is about efficiency, not speed.
Pro Tip: If you’re unsure about a repair, take a photo and ask for help online. Many holiday lighting forums have experienced users who can guide you.
FAQs About How to Fix LED Christmas Light 3 Strings Quick and Easy
Here are the most common questions people ask when trying to fix their LED Christmas lights.
Q: Why do only two of my three LED strings light up?
This usually happens when the third string has a bad bulb, loose connection, or blown fuse. But it could also be a problem in the second string—if it’s not passing power to the third. Always test each string individually to find the root cause.
Q: Can I fix LED lights without a repair kit?
Yes, but it’s harder. You’ll need replacement bulbs, fuses, and basic tools. A bulb tester or multimeter is highly recommended. Without one, you’re relying on trial and error, which takes longer and risks damaging the lights further.
Q: Are LED Christmas lights repairable like incandescent ones?
Not exactly. LEDs have shunts and complex circuits, so they behave differently. A single bad LED can sometimes shut down a section, even if the rest are fine. But with the right tools, they’re often easier to diagnose and fix.
Q: What if the entire string is dead, but the fuses are fine?
Check for a break in the wire. Use the bulb tester or multimeter to trace continuity. Look for kinks, cuts, or damaged sockets. If you find a break, you can splice in a new section or replace the entire string.
Q: Can moisture damage LED Christmas lights?
Yes. Water can corrode contacts and short the circuit. If your lights are outdoors, make sure all connections are waterproofed with covers or electrical tape. Indoor lights can also be affected by humidity in garages or basements.
Q: How many strings can I safely connect together?
Most manufacturers recommend no more than three to four strings. Check the label on your lights for the exact number. Exceeding this can overload the circuit and cause fuses to blow.
Q: Is it worth fixing old LED strings, or should I just buy new ones?
If the string is less than 5 years old and the issue is minor (like a few bad bulbs or a blown fuse), fixing it is worth it. But if the wiring is frayed, multiple sockets are damaged, or the controller is broken, replacement might be cheaper and safer.
Final Thoughts
Learning how to fix LED Christmas light 3 strings quick and easy is a skill that pays off every holiday season. You’ll save money, reduce waste, and keep your home glowing with festive cheer.
Remember: Start with safety—always unplug before working. Test each string individually, check fuses, use a bulb tester, and replace only what’s broken. With patience and the right tools, most issues are fixable at home.
Keep a repair kit handy, label your strings, and store them properly. That way, when the lights go dark next year, you’ll know exactly what to do.
Don’t let a few dead bulbs dim your holiday spirit. Grab your tools, follow this guide, and get those lights shining again. Your tree, your porch, and your family will thank you.
Now go light up the night—safely and brilliantly.

