Featured image for how to make outdoor string light pole
Image source: i2.wp.com
Transform your backyard into a glowing oasis by building a sturdy outdoor string light pole in just 5 simple steps. With basic tools and materials like a wooden or metal pole, ground sleeve, and secure mounting hardware, you can effortlessly elevate your lighting setup for patios, gardens, or event spaces. This DIY solution ensures professional-looking results while offering flexibility in height and placement for maximum ambiance.
Key Takeaways
- Choose durable materials: Use weather-resistant metal or treated wood for long-lasting poles.
- Secure deep installation: Bury poles at least 2 feet deep for stability in wind.
- Plan spacing wisely: Space poles 8–10 feet apart to support string light weight evenly.
- Use proper hardware: Attach lights with UV-resistant zip ties or hooks for safety.
- Check local codes: Verify height and permit requirements before building or installing.
📑 Table of Contents
How to Make Outdoor String Light Pole in 5 Easy Steps
Remember that first summer barbecue where the sun set a little too early, and your backyard turned into a shadowy maze? You had the grill going, the drinks chilled, and the music playing—but the mood was dimmed by the lack of light. That’s when it hit me: outdoor string lights could’ve transformed the space into a magical, inviting retreat. But here’s the catch—there were no trees to hang them on, and the house walls were too far apart. So, I decided to build my own outdoor string light pole.
Since then, I’ve built several versions of these poles for patios, pergolas, gardens, and even wedding venues. What started as a DIY necessity has become a go-to solution for anyone wanting to elevate their outdoor ambiance. Whether you’re hosting a party, enjoying a quiet evening, or just want to make your backyard more functional after dark, a custom string light pole is a simple, affordable, and stylish fix. In this guide, I’ll walk you through how to make an outdoor string light pole in 5 easy steps—from planning to final touches. No fancy tools or engineering degree required. Just practical advice, real-life tips, and a little creativity.
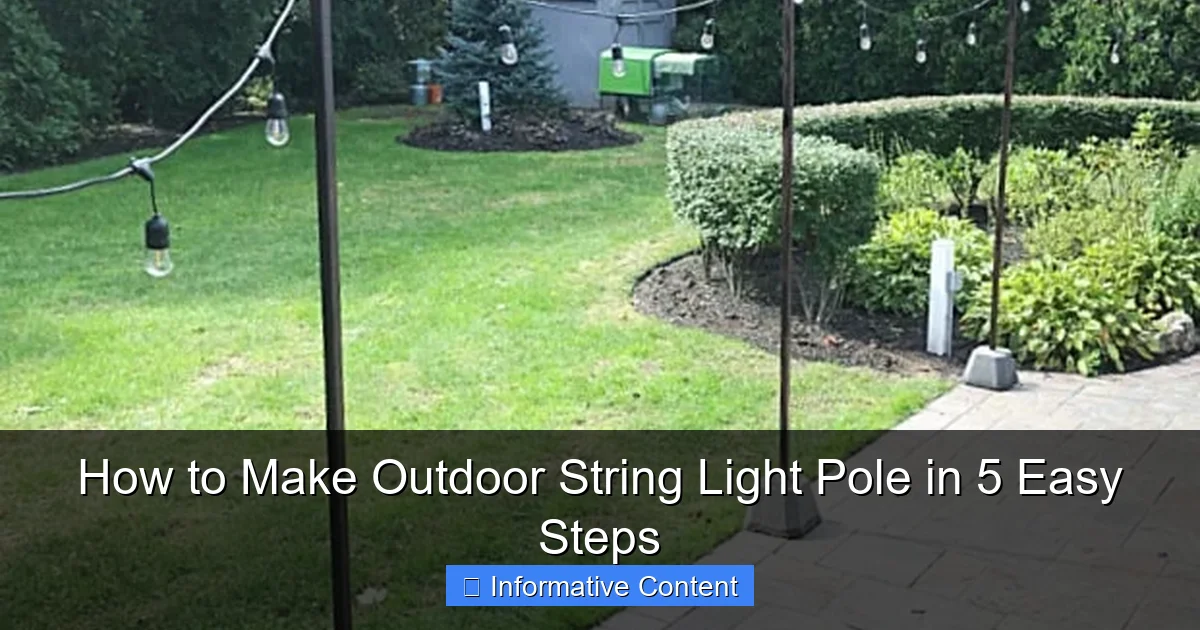
Step 1: Plan Your String Light Pole Setup
Before you start digging holes or buying materials, take a moment to plan. A little prep now saves a lot of frustration later. Think of this like sketching the blueprint for your dream outdoor lighting.
Visual guide about how to make outdoor string light pole
Image source: 1.bp.blogspot.com
Assess Your Space and Lighting Needs
Start by walking around your yard or patio at night. Where do you want the light to fall? Do you need it over a dining table, a seating area, or a pathway? Consider:
- Light coverage: Measure the distance between anchor points (e.g., house and a tree, or two posts). This helps you choose the right pole height and light strand length.
- Power source: Will your string lights plug into an outdoor outlet? If so, map the shortest, safest route from the outlet to your pole.
- Weather exposure: Is the area windy, rainy, or shaded? This affects pole stability and light bulb type (LEDs are more durable in harsh weather).
For example, I once built a pole for a friend’s poolside bar area. The space was 12 feet wide, with a nearby outlet. We decided on two 7-foot poles, spaced 10 feet apart, with a zigzag light pattern for even coverage.
Choose the Right Pole Height and Spacing
Most people go with poles between 6 and 8 feet tall. Here’s why:
- 6 feet: Ideal for low-hanging lights over tables or small seating nooks. Lights stay out of head-bumping range.
- 7–8 feet: Best for larger areas, pathways, or when you want lights to arch slightly between poles.
Spacing depends on your light strand length and desired look. For standard 25-foot string lights, poles spaced 15–20 feet apart work well. If you’re using multiple strands, stagger the poles to create a canopy effect. Tip: Use painter’s tape to mark pole positions on the ground before building. It’s easy to adjust and leaves no marks.
Sketch a Simple Layout
Grab a piece of paper or use a free app like SketchUp Free or Google Drawings. Draw:
- Pole locations
- Light strand paths (straight lines, zigzags, or X-patterns)
- Distance from power source
- Any obstacles (fences, plants, furniture)
This sketch becomes your “DIY map” and helps you estimate materials. For instance, my last project used a 20-foot span with a central support pole—my sketch showed exactly where to place it to avoid a tree root.
Step 2: Gather Materials and Tools
Now that you’ve planned, it’s time to shop. The beauty of this project is that most materials are easy to find and affordable. Here’s what you’ll need—plus alternatives if you’re on a tight budget or want a unique look.
Essential Materials
- Poles: 4×4 pressure-treated lumber (6–8 ft), galvanized steel conduit (EMT), or pre-made metal poles. Wood is cheaper and easier to customize; metal is more durable in wet climates.
- Base/footings: Concrete mix (for permanent setups) or ground stakes (for temporary or lightweight poles).
- Hardware: Eye hooks, lag screws, zip ties, and stainless steel wire (if using a wire support system).
- String lights: Weatherproof, outdoor-rated LED strands (25–50 ft). Look for shatterproof bulbs and a UL rating.
- Optional: Decorative post caps (wood, metal, or solar-powered), paint or stain (for wood poles), and extension cords.
Tools You’ll Need
- Measuring tape
- Drill with screwdriver bits
- Saw (circular, miter, or handsaw)
- Post hole digger or spade
- Level
- Shovel
- Wrench (if using metal poles)
- Work gloves and safety glasses
Pro tip: If you don’t own a post hole digger, rent one from a hardware store for $20–$30. It’s worth it—digging by hand is exhausting!
Budget-Friendly and Creative Alternatives
No 4x4s? No problem. Try these swaps:
- PVC pipe: Use 2-inch Schedule 40 PVC (painted to prevent UV damage). Lightweight and rustproof, but not for windy areas.
- Fence posts: Repurpose old wooden or metal fence posts. Sand and stain for a rustic look.
- Tree trunks: If you have sturdy trees, attach a short wooden crossbeam with lag screws instead of poles. (Just don’t drill too deep—it harms the tree.)
- Concrete blocks: For a temporary setup, place poles in cinder blocks filled with concrete. Not as sleek, but functional.
For example, I once used repainted PVC pipes for a beachfront rental. They held up for a summer and cost under $40 for two poles. Not ideal for long-term, but perfect for the season.
Step 3: Build and Install the Poles
Time to get your hands dirty. This step is all about stability and safety. A wobbly pole can ruin your lights—or worse, cause injury. Let’s build something solid.
Cut and Prep the Poles
For wood poles:
- Cut 4×4 lumber to your desired height (e.g., 7 ft for a 6 ft finished height with 1 ft in the ground).
- Sand rough edges and seal with outdoor wood stain or paint. I use a cedar stain—it resists rot and looks great.
- Drill pilot holes for eye hooks at the top (1–2 inches down) and any mid-height points if using multiple light strands.
For metal poles (EMT conduit):
- Cut to length with a hacksaw or pipe cutter.
- Sand cut edges to prevent rust.
- Use a drill to make holes for eye hooks or attach a wooden crossbeam to the top.
Dig and Set the Footings
This is the most important part for stability. Here’s how:
- Dig holes 12–18 inches deep (deeper in windy areas or for taller poles).
- Place the pole in the hole. Use a level to ensure it’s perfectly vertical. Ask a friend to hold it while you check.
- Fill the hole with concrete mix (follow package instructions). Leave the top 2 inches for soil or mulch to hide the concrete.
- Let the concrete cure for at least 24 hours (48 is better). Don’t skip this—rushing leads to wobbly poles!
Alternative for temporary setups: Use ground stakes (like tent pegs) or drive metal poles into the ground with a sledgehammer. Less stable, but quick.
Add Eye Hooks and Support
- Screw stainless steel eye hooks into the pilot holes. These will hold your light strands or support wires.
- For extra stability in windy areas, add diagonal support braces (wood or metal) from the pole to the ground, anchored with stakes.
- If using a wire system (e.g., for a canopy), run stainless steel wire between poles. Tighten with turnbuckles to keep it taut.
My friend Sarah used diagonal braces on her seaside poles. After a storm, they were the only lights still standing—hers were the only ones with braces!
Step 4: Hang the String Lights
Now for the fun part—hanging the lights! This is where your space starts to transform. But don’t just toss them up. A little technique goes a long way.
Choose Your Hanging Pattern
- Straight lines: Simple and clean. Attach lights directly to eye hooks.
- Zigzag: More coverage and visual interest. Use zip ties to attach strands diagonally between poles.
- X-pattern: Great for large areas. Hang two strands in an “X” from pole to pole.
- Canopy: For a magical effect, run multiple strands parallel, spaced 1–2 feet apart.
Tip: Test your pattern with painter’s tape before hanging. It’s easier to adjust on the ground than up a ladder.
Hang the Lights Safely
- Start at the end closest to the power source. This reduces cord strain.
- Use outdoor-rated zip ties or light clips to attach strands to eye hooks. Never use nails or screws—they damage bulbs and cords.
- For straight lines: Hook one end to the first pole, stretch the strand taut, and attach to the second pole. Use a helper to hold the other end.
- For zigzag/X-patterns: Attach the first strand, then use zip ties to secure the second strand at an angle. Overlap bulbs slightly for even glow.
- Leave a 1–2 inch sag between poles. Too tight = stress on poles; too loose = droopy lights.
I once hung lights too tight and snapped a bulb. Lesson learned: a little sag is better than a snapped cord.
Connect to Power
- Plug lights into a GFCI-protected outdoor outlet. This is a safety must.
- Use a weatherproof cord cover or bury the cord under mulch if it crosses walkways.
- For multiple strands, use a heavy-duty outdoor extension cord with a built-in timer.
Bonus: Add a smart plug to control lights with your phone or voice assistant (e.g., Alexa). I love turning mine on from the couch!
Step 5: Add Finishing Touches and Maintain
You’re almost done! These final steps ensure your pole lasts and looks great for years.
Decorate and Personalize
- Post caps: Add a wooden cap, metal finial, or solar-powered light to the top. My favorite? A solar cap that glows at night.
- Paint or stain: Match poles to your home’s exterior or go bold with colors.
- Wrap with greenery: Use artificial ivy or fairy lights for a whimsical look.
- Signs or banners: Hang a “Welcome” sign or seasonal banner between poles.
For a wedding, I wrapped poles with white tulle and added hanging mason jars. The effect was stunning—and cost under $50.
Weatherproof and Protect
- Seal wood poles annually with waterproof sealant.
- Inspect eye hooks and zip ties every season. Replace rusted or frayed parts.
- Store lights indoors in winter if you live in a cold climate. Or, use all-season LED strands rated for freezing temps.
- For metal poles, check for rust and repaint as needed.
Maintenance Schedule
Here’s a simple table to keep your setup in top shape:
| Task | Frequency | Tip |
|---|---|---|
| Inspect poles and hardware | Every 3 months | Look for cracks, rust, or loose eye hooks. |
| Clean light strands | Before each season | Wipe bulbs with a damp cloth; check for broken bulbs. |
| Re-seal wood poles | Annually | Apply waterproof stain in dry weather. |
| Check power cords | Before heavy use | Replace frayed or cracked cords immediately. |
| Trim nearby plants | As needed | Prevents damage to lights and poles. |
I follow this schedule religiously. Last year, a loose eye hook saved me from a potential fall—thanks to a quick inspection!
Common Mistakes and How to Avoid Them
Even the best DIYers make errors. Here’s what I’ve learned the hard way—so you don’t have to.
Overlooking Wind and Weather
Wind is the #1 enemy of string light poles. A gust can snap a pole or pull out eye hooks. To prevent this:
- Use deeper footings (18+ inches) in windy areas.
- Add diagonal braces or ground anchors.
- Choose LED strands with flexible, weatherproof cords.
My first pole in a coastal yard collapsed after a storm. The fix? Deeper concrete and braces. Now it’s survived three hurricanes!
Using the Wrong Materials
Not all wood or metal is created equal. Avoid:
- Untreated wood: It rots in 1–2 years. Always use pressure-treated or cedar.
- Aluminum conduit: It’s lightweight but bends easily. Opt for galvanized steel.
- Indoor lights: They’ll short out in rain. Only use outdoor-rated lights.
Skipping the Level
A crooked pole looks unprofessional and stresses the lights. Always use a level—even if you’re “sure” it’s straight. I once skipped it and ended up with a leaning pole that looked like the Tower of Pisa.
Overloading the Pole
Too many lights or heavy decorations can bend or break poles. Stick to:
- 1–2 light strands per pole
- Lightweight decor (e.g., paper lanterns, not heavy metal signs)
For a birthday party, I hung 10 strands on one pole. The pole bent like a banana. Lesson: spread the load!
Building your own outdoor string light pole isn’t just practical—it’s a way to make your outdoor space truly yours. Whether you’re lighting up a cozy patio or a sprawling garden, this project adds charm, function, and a touch of magic. And the best part? You did it yourself.
From planning to maintenance, these 5 steps give you a sturdy, beautiful setup that lasts. Remember: a little patience in the beginning (like waiting for concrete to cure) pays off in long-term enjoyment. And don’t be afraid to experiment—swap materials, try new patterns, or add seasonal decor. Your pole is a canvas.
So grab your tools, sketch your layout, and start building. That first evening with your lights glowing? It’s worth every minute. And who knows—you might just inspire your neighbors to start their own DIY journey. After all, the best outdoor spaces are the ones we create together.
Frequently Asked Questions
How do I choose the right materials for an outdoor string light pole?
Select weather-resistant materials like galvanized steel, aluminum, or treated wood to ensure durability. Avoid untreated metals or wood, as they can rust or rot over time when exposed to outdoor elements.
Can I make an outdoor string light pole without digging into the ground?
Yes, use a weighted base like a planter filled with concrete or sandbags to stabilize the pole. This method is ideal for patios or decks where permanent installation isn’t possible.
What height should my DIY outdoor string light pole be?
For optimal lighting, aim for 7–10 feet tall to avoid glare and ensure even coverage. Taller poles work better for large spaces, while shorter ones suit intimate seating areas.
How do I secure the string lights to the pole without damaging them?
Use removable hooks, zip ties, or eye screws to attach lights without puncturing the wires. This keeps the setup flexible and prevents damage during removal or adjustments.
Are there portable options for a DIY outdoor string light pole?
Yes, consider foldable or telescoping poles made of lightweight aluminum for easy storage. These are perfect for renters or those who want temporary setups for events.
How do I prevent my outdoor string light pole from swaying in wind?
Add guy wires (tension cables) anchored to the ground or use a wider base for extra stability. Ensure the pole is firmly seated in concrete or a weighted stand for added support.

