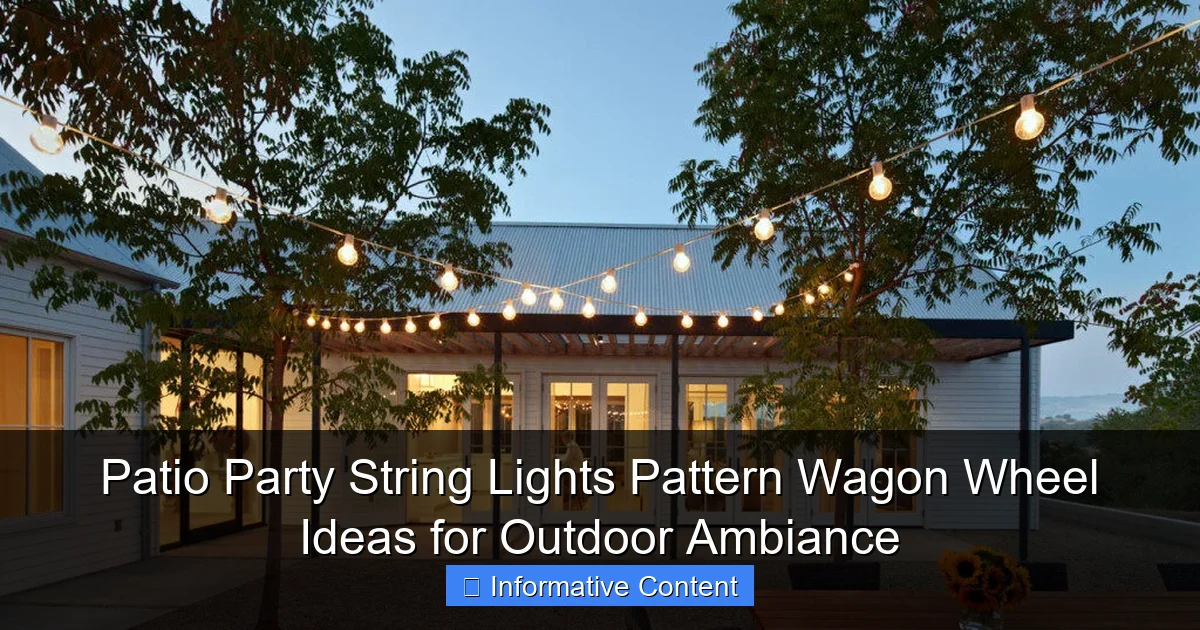
Featured image for patio party string lights pattern wagon wheel
Image source: img.yardenvy.com
Transform your patio into a captivating outdoor oasis with wagon wheel string light patterns that blend rustic charm and modern ambiance. These easy-to-install, circular designs create a warm, inviting glow perfect for parties, enhancing mood and style with minimal effort.
Key Takeaways
- Plan spacing carefully: Ensure even gaps between lights for a balanced wagon wheel effect.
- Use durable materials: Opt for weather-resistant string lights to withstand outdoor conditions.
- Center anchor point: Secure lights to a central hook for easy radial pattern setup.
- Layer lighting: Combine wagon wheel lights with ground-level fixtures for depth.
- Dimmer switch: Adjust brightness to set the perfect mood for any patio event.
- Measure twice: Calculate patio size first to avoid overbuying or underlighting the space.
📑 Table of Contents
- Why the Wagon Wheel String Light Pattern Is a Game-Changer for Your Patio
- How the Wagon Wheel Pattern Works (And Why It’s Worth the Effort)
- Step-by-Step Guide: How to Install a Wagon Wheel String Light Pattern
- Creative Variations: Taking Your Wagon Wheel to the Next Level
- Choosing the Right String Lights: What to Look For
- Common Mistakes and How to Avoid Them
- Bringing It All Together: Your Perfect Patio Ambiance
Why the Wagon Wheel String Light Pattern Is a Game-Changer for Your Patio
Imagine this: it’s a warm summer evening, the air is thick with the scent of grilled food, and laughter floats through the air. You step onto your patio, and suddenly, the space transforms. A glowing patio party string lights pattern wagon wheel stretches across your pergola, casting a warm, inviting glow that makes everyone stop and say, “Wow.” That’s the magic of this simple yet striking lighting design.
String lights aren’t new, but the wagon wheel pattern? That’s where things get special. Instead of the usual crisscross or zigzag, this style mimics the spokes of an old-fashioned wagon wheel—radiating from a central hub outward. It’s not just about light; it’s about structure. The pattern adds visual interest, creates a focal point, and makes your outdoor space feel intentional and cozy. Whether you’re hosting a birthday bash, a family barbecue, or just unwinding with a glass of wine, this lighting setup instantly elevates the mood.
How the Wagon Wheel Pattern Works (And Why It’s Worth the Effort)
At first glance, the wagon wheel might seem complicated. But once you break it down, it’s surprisingly straightforward—and the payoff is huge. Think of it like a pie chart made of lights. A central anchor point (usually a hook or a beam) holds the hub, and then strings of lights stretch outward like spokes, connecting to outer anchor points around your patio.
Visual guide about patio party string lights pattern wagon wheel
Image source: idlights.com
The Anatomy of a Wagon Wheel Setup
Here’s what you’ll need to create your own:
- Central hub: This is the heart of the design. It could be a ceiling hook, a pergola beam, or even a temporary pole. The hub must be strong enough to support the tension of the lights.
- Outer anchor points: These are usually hooks, nails, or brackets placed around the perimeter of your patio—on walls, posts, or railings. The more evenly spaced they are, the cleaner the pattern.
- String lights: Opt for LED, weatherproof, and dimmable options. You’ll need enough length to go from the center to each outer point. A 25–50-foot string is typical, depending on your patio size.
- Extension cords or power source: Make sure you have a safe, accessible outlet. Use outdoor-rated extension cords and avoid overloading circuits.
- Measuring tape and level: These help ensure symmetry and prevent a lopsided wheel.
Why This Pattern Stands Out
Unlike random string light arrangements, the wagon wheel creates visual balance. It draws the eye upward and outward, making your patio feel larger and more intentional. Plus, it’s incredibly versatile. You can:
- Use warm white lights for a cozy, romantic feel.
- Switch to colored or twinkling lights for holidays or themed parties.
- Layer it with fairy lights or lanterns for extra dimension.
One friend of mine, Sarah, tried this on her 12×16-foot patio. She used 10 outer hooks (one every 3–4 feet) and a single 40-foot string light that she split into 10 segments. “I was skeptical at first,” she told me. “But once it was up, it felt like we were dining under a constellation. It’s now the centerpiece of every gathering.”
Step-by-Step Guide: How to Install a Wagon Wheel String Light Pattern
You don’t need to be a DIY expert to pull this off. With a little planning and some basic tools, you can have your patio glowing in under two hours. Here’s how to do it right—without pulling your hair out.
Step 1: Plan Your Layout
Start by sketching your patio on paper or using a digital tool. Mark where the central hub will go (ideally in the middle of the space). Then, decide how many “spokes” you want. Most people use 6–10 spokes for a balanced look. For a 10-foot radius, 8 spokes spaced every 45 degrees works well.
Pro tip: Use painter’s tape to mark the outer anchor points on your patio. This lets you visualize the pattern before drilling any holes.
Step 2: Install the Anchors
Drill pilot holes and install hooks or brackets at your central hub and outer points. Use a level to make sure they’re even. If you’re attaching to wood, stainless steel screws or eye hooks are ideal. For masonry or stucco, use anchors designed for outdoor use.
One thing to watch out for: don’t overtighten. You want the hooks secure, but not so tight that they bend or break the material.
Step 3: Hang the Lights
Here’s the fun part. Start by attaching one end of your string light to the central hub. Then, stretch it out to the first outer anchor point and secure it. Repeat for each spoke. If your lights have clips or loops, use them. If not, zip ties work great—just make sure they’re snug but not cutting into the cord.
For longer spans, consider using support lines (like thin steel cable) to prevent sagging. Attach the lights to the cable with clips or zip ties. This keeps the pattern crisp and prevents damage over time.
Step 4: Test and Adjust
Once all the lights are up, plug them in. Walk around and check for:
- Uneven spacing between spokes
- Sagging or drooping lights
- Flickering bulbs (replace any duds)
If something looks off, make small adjustments. You can loosen zip ties, reposition hooks, or add temporary supports. It’s okay to tweak—this is your space, and it should feel right.
Step 5: Power and Safety
Use a GFCI-protected outdoor outlet. If you’re running multiple light strings, use a splitter or timer to avoid overloading the circuit. For permanent setups, consider burying the cords or running them through conduit to protect them from weather and foot traffic.
One common mistake? Forgetting to account for wind. If your area gets gusty, add extra supports or use heavier-duty hooks. A friend in Colorado learned this the hard way when a storm knocked down her entire setup. “Now I use stainless steel cables,” she laughs. “Lesson learned.”
Creative Variations: Taking Your Wagon Wheel to the Next Level
The classic wagon wheel is beautiful, but why stop there? With a few tweaks, you can customize the pattern to match your style, season, or event. Here are some creative ideas that go beyond the basics.
Double-Layer Wagon Wheel
Why settle for one wheel when you can have two? Create a concentric wagon wheel by adding a second ring of lights inside or outside the first. Use different colors or bulb styles for contrast—like warm white on the outer ring and soft blue on the inner.
This works especially well for larger patios (16×20 feet or bigger). It adds depth and makes the space feel more dynamic. Just make sure the inner and outer spokes are offset—not directly aligned—so the pattern doesn’t look messy.
Asymmetrical or Themed Designs
Not every patio is symmetrical, and that’s okay! You can adapt the wagon wheel to fit odd-shaped spaces. For example:
- Half-wheel: Great for patios with a solid wall on one side. Run the spokes from the center to the open side, creating a semi-circular glow.
- Offset hub: If your central beam is off-center, use it as the hub. Adjust the outer anchors to match the patio’s shape.
- Themed colors: Use red, white, and blue for Fourth of July. Pastels for a baby shower. Gold and white for winter weddings.
One couple I know turned their wagon wheel into a constellation map for a stargazing party. They used glow-in-the-dark tape to mark star positions on the light strings and labeled constellations with small tags. “It was magical,” they said. “The lights felt like real stars.”
Integrate with Other Lighting
The wagon wheel doesn’t have to stand alone. Layer it with:
- Fairy lights: Drape them between the spokes or along the perimeter for a soft, twinkling effect.
- String lanterns: Hang paper or metal lanterns at the outer anchor points.
- Ground lights: Use LED path lights or solar stakes to guide guests to the patio.
This layered approach creates a full ambiance, not just a single focal point. It’s especially effective for evening events when you want the whole space to feel lit—not just the center.
Seasonal Swaps
The best part? You can change the look without changing the structure. Swap out bulbs or add accessories seasonally:
- Spring: Pastel bulbs + floral garlands
- Summer: Bright white + citronella candles
- Fall: Amber lights + leaf-shaped cutouts
- Winter: Cool white + icicle lights
One neighbor does this every year. “It’s like redecorating without the hassle,” she says. “The wagon wheel is the frame; the season is the art.”
Choosing the Right String Lights: What to Look For
Not all string lights are created equal. The right choice can make or break your wagon wheel setup. Here’s what to consider before buying.
Weather Resistance
Outdoor lights need to withstand rain, wind, UV rays, and temperature swings. Look for:
- IP65 or higher rating: This means the lights are dust-tight and protected against water jets.
- UV-resistant coating: Prevents yellowing or cracking from sun exposure.
- Sturdy cord material: Rubber or silicone is better than cheap plastic.
Avoid “indoor/outdoor” lights unless they’re explicitly rated for permanent outdoor use. I once bought a set labeled “outdoor,” only to find the bulbs cracked after one rainy weekend. Lesson learned.
Bulb Type and Color
LED bulbs are the gold standard. They’re energy-efficient, long-lasting (20,000+ hours), and generate little heat. But not all LEDs are the same:
- Warm white (2700K–3000K): Cozy, inviting—perfect for most patios.
- Cool white (4000K–5000K): Crisp and bright—good for task lighting but can feel sterile.
- Color-changing: Fun for parties, but may not suit everyday use.
- Edison-style (vintage bulbs): Adds charm, but check if they’re dimmable.
Pro tip: Buy a set with replaceable bulbs. If one burns out, you don’t have to replace the whole string.
Length and Spacing
Measure your patio’s radius (from center to outer edge) and add 1–2 feet for slack. Most string lights come in 25, 50, or 100-foot lengths. For a wagon wheel, you’ll likely need multiple strings or a long one that you can split into segments.
Spacing between bulbs matters too. Closer bulbs (4–6 inches apart) create a dense glow; wider spacing (12+ inches) feels more open. For a wagon wheel, 6–8 inches is usually ideal—dense enough to shine, but not overwhelming.
Power and Control
Consider how you’ll power and adjust the lights:
- Plug-in vs. solar: Plug-in is reliable; solar works if you have sun access.
- Dimmable: Lets you set the mood (e.g., bright for cooking, dim for relaxing).
- Remote or app control: Handy for turning lights on/off without going outside.
- Timer: Automatically turns lights off after a set time.
I use a smart plug with a timer. At sunset, the lights turn on automatically. At 11 p.m., they shut off. No fuss, no wasted energy.
Common Mistakes and How to Avoid Them
Even simple projects can go sideways. Here are the top pitfalls I’ve seen (and made myself), plus how to fix them.
Overcomplicating the Design
It’s tempting to add too many features—multiple layers, color-changing bulbs, motion sensors. But more complexity means more things that can break. Start simple. Get the basic wagon wheel right first, then add extras later.
One couple tried to build a 12-spoke, double-layer, color-changing setup on their first try. “We spent three nights troubleshooting,” they said. “Now we just use a single warm white wheel. It’s perfect.”
Ignoring Weight and Tension
String lights aren’t heavy, but over time, wind and gravity can pull on the anchors. If your central hub is weak, the whole pattern will sag. Use sturdy materials—like stainless steel hooks—and check tension after a few weeks.
Also, don’t hang lights from tree branches unless they’re thick and healthy. A storm can snap a branch and take your lights with it.
Forgetting About Power Access
Nothing ruins a party like lights that won’t turn on. Make sure your outlet is:
- Close enough (within 10–15 feet)
- GFCI-protected (required for outdoor use)
- Not shared with other high-draw appliances
Use outdoor-rated extension cords and keep them off walkways to avoid tripping.
Not Testing Before Finalizing
Always test the lights before securing them permanently. Plug them in, check for dead bulbs, and make sure the pattern looks right. If you’re using multiple strings, connect them first to see if the total length works.
One person installed all the lights, only to find the last spoke was 2 feet short. “I had to take it all down and re-measure,” they said. “Now I test before I commit.”
Neglecting Maintenance
Outdoor lights need care. Check them every few months for:
- Frayed cords
- Corroded connections
- Dead bulbs
- Debris (leaves, spiderwebs)
Wipe bulbs with a damp cloth and replace any damaged parts. A little upkeep keeps your setup safe and beautiful for years.
| Feature | Ideal Choice | Why It Matters |
|---|---|---|
| Light Type | LED, warm white, 2700K–3000K | Energy-efficient, long-lasting, cozy glow |
| Weather Rating | IP65 or higher | Resists rain, dust, and UV damage |
| Bulb Spacing | 6–8 inches | Balanced brightness without gaps |
| Control | Dimmable + timer | Sets mood, saves energy |
| Installation | Stainless steel hooks + support cables | Prevents sagging and damage |
Bringing It All Together: Your Perfect Patio Ambiance
At the end of the day, the patio party string lights pattern wagon wheel isn’t just about lighting—it’s about creating a space where memories happen. Whether it’s a quiet night with your partner, a lively game night with friends, or a holiday celebration with the whole family, the right lighting sets the tone.
I’ll never forget the first time I saw my neighbor’s wagon wheel setup. It was a rainy evening, and the lights were on, casting a warm, golden glow across her patio. She waved me over with a smile. “Come on in,” she said. “It’s cozy out here.” And it was. The lights, the laughter, the smell of grilled veggies—it felt like home.
That’s the power of this simple design. It’s not flashy. It’s not high-tech. But it’s human. It invites you in. It says, “Stay a while.” And in a world that’s always rushing, that’s a gift.
So whether you’re a DIY newbie or a seasoned pro, give the wagon wheel a try. Start small. Use what you have. Tweak it until it feels right. And when the lights come on, step back and take a breath. You’ve just turned your patio into a place where moments matter.
Frequently Asked Questions
What are the best ways to use patio party string lights in a wagon wheel pattern?
For a stunning wagon wheel pattern, drape string lights radially from a central point (like a pergola beam or tree) outward to your patio’s perimeter. This creates a starburst effect that enhances ambiance and evenly distributes light for gatherings. Use adhesive hooks or zip ties for secure, damage-free installation.
How do I install wagon wheel string lights without damaging my patio?
Use removable adhesive hooks, gutter clips, or zip ties to anchor the lights without drilling holes. Ensure the central hub (where lights converge) is secured to a sturdy structure like a post or beam for stability. This method preserves your patio while achieving the desired patio party string lights pattern wagon wheel look.
Can I use wagon wheel string lights for year-round outdoor decor?
Yes, opt for weatherproof LED string lights with durable wiring to withstand rain, wind, and sun. The wagon wheel pattern adds charm to both festive events and everyday evenings, making it a versatile choice for year-round outdoor ambiance.
What spacing works best for a wagon wheel string light design?
Space radial lines 12–18 inches apart for balanced illumination without overcrowding. Adjust based on your patio size—closer spacing for cozier areas, wider for larger spaces. Consistency is key to achieving a polished wagon wheel effect.
Are there solar-powered options for wagon wheel string lights?
Absolutely! Solar-powered string lights with a central solar panel are ideal for off-grid setups. Position the panel in direct sunlight, and connect it to the radial lights to create an eco-friendly patio party string lights pattern wagon wheel display.
How do I troubleshoot uneven lighting in my wagon wheel pattern?
Check for loose connections, dim bulbs, or voltage drops in longer runs. Use lights with equal wire lengths or a splitter to ensure uniform brightness. Test sections individually before finalizing the layout.

