Featured image for putting string lights in backyard with garden stakes
Image source: m.media-amazon.com
Transform your backyard into a magical nighttime retreat by installing string lights with garden stakes—simple, affordable, and instantly impactful. Just drive the stakes into the ground along pathways, fences, or open spaces, then drape or clip the lights for a professional look without the cost. Weather-resistant stakes and LED string lights ensure durability and dazzling ambiance all season long.
Key Takeaways
- Plan your layout: Sketch light placement before installing stakes for balanced coverage.
- Choose weatherproof lights: Opt for UL-listed or outdoor-rated string lights for durability.
- Space stakes evenly: Maintain 4–6 feet between stakes to prevent sagging or strain.
- Secure stakes properly: Hammer stakes at least 8 inches deep for wind resistance.
- Use zip ties: Attach lights to stakes with UV-resistant ties for a tidy, long-lasting hold.
- Hide cords smartly: Tuck wires under mulch or along borders to avoid tripping hazards.
📑 Table of Contents
- How to Install String Lights in Backyard with Garden Stakes for Stunning Nighttime Ambiance
- Choosing the Right String Lights for Your Backyard
- Selecting and Preparing Garden Stakes
- Step-by-Step Installation Guide
- Creative Layouts and Design Ideas
- Safety, Maintenance, and Long-Term Care
- Final Thoughts: Light Up Your Life
How to Install String Lights in Backyard with Garden Stakes for Stunning Nighttime Ambiance
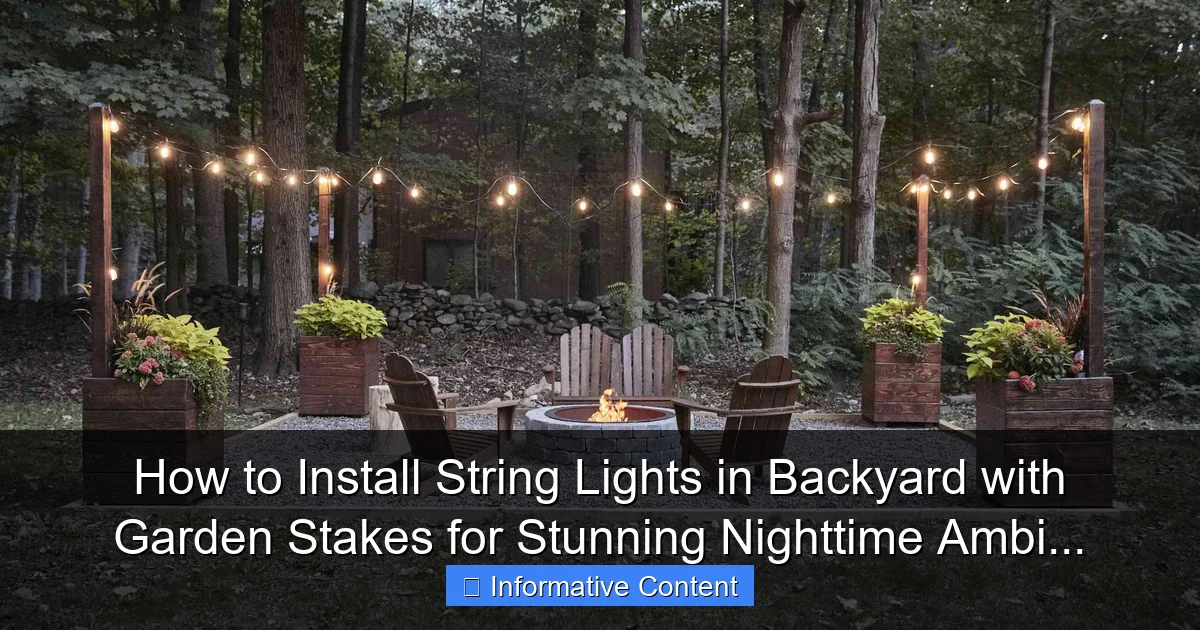
Picture this: It’s a warm summer evening, and you’re sitting in your backyard with friends, sipping on iced tea or maybe a glass of wine. The sun has just dipped below the horizon, and suddenly, your garden transforms. Soft, warm light spills from above, crisscrossing the space like fireflies caught in a gentle net. You didn’t need a professional lighting crew or a major renovation—just a few simple tools and a vision. That’s the magic of putting string lights in backyard with garden stakes.
I remember the first time I tried this. I had bought a set of vintage-style Edison bulbs, thinking they’d look great draped between trees. But my backyard had no tall trees, and the fence was too far apart. I stood there, lights in hand, feeling defeated—until I remembered those simple metal garden stakes I’d seen at the hardware store. A quick trip later, and I had my solution. Within an hour, I’d transformed my plain patio into a cozy, inviting oasis. Since then, I’ve experimented with different layouts, materials, and techniques, and I’ve learned a few tricks along the way. Whether you’re planning an intimate dinner party or just want a peaceful spot to unwind at night, this guide will walk you through how to install string lights in your backyard using garden stakes—safely, beautifully, and affordably.
Choosing the Right String Lights for Your Backyard
Before you start hammering stakes into the ground, it’s important to pick the right kind of string lights. Not all lights are created equal, and choosing the wrong type can lead to flickering, short circuits, or a look that clashes with your space. Let’s break it down.
Visual guide about putting string lights in backyard with garden stakes
Image source: thespruce.com
Types of String Lights: LED vs. Incandescent
Most backyard string lights today come in two main types: LED and incandescent. I’ve used both, and here’s what I’ve learned:
- LED lights are energy-efficient, last longer (often 25,000+ hours), and run cooler. They’re perfect for year-round use and are less likely to overheat, even if left on for hours. Plus, they’re available in warm white, cool white, and even color-changing options.
- Incandescent bulbs give off that classic, warm glow—think vintage café vibes. But they use more electricity, burn hotter, and don’t last as long. I love them for occasional events, but for regular use, I stick with LEDs.
For backyard use, especially with garden stakes, I recommend outdoor-rated LED string lights with a warm white color temperature (2700K–3000K). They provide a cozy, inviting glow without being too harsh.
Bulb Shape and Spacing
The look of your lights depends a lot on the bulb style and how far apart they’re spaced.
- Edison-style bulbs (filament inside) are trendy and give a rustic, industrial feel. Great for modern-rustic patios.
- Globe or round bulbs offer a softer, more uniform look. Ideal for family-friendly backyards.
- Mini lights (small, closely spaced) work well for delicate, twinkling effects—perfect for wrapping around stakes or trees.
Spacing matters too. Lights spaced 4–6 inches apart are ideal for visibility and ambiance. Too close, and it looks like a runway. Too far, and the effect gets lost.
Power Source and Length
Consider how you’ll power your lights. Most string lights plug into an outlet, but you’ll need an outdoor-rated extension cord and weatherproof outlet covers to stay safe. Solar-powered options exist, but they’re less reliable in cloudy climates or during winter.
Measure your backyard layout before buying. Add 10–15% extra length for slack and draping. A 25-foot string might only cover 22 feet when stretched between stakes. And if you plan to connect multiple strands, check the manufacturer’s max connection limit (usually 3–5 strands).
Selecting and Preparing Garden Stakes
Garden stakes are the unsung heroes of backyard lighting. They’re affordable, easy to install, and blend in during the day. But not all stakes are built the same.
Material Matters: Metal vs. Plastic
I’ve used both metal and plastic stakes, and here’s my take:
- Metal stakes (usually galvanized steel or aluminum) are sturdy, rust-resistant, and can support heavier lights. They’re ideal for permanent or semi-permanent setups. Look for stakes with a pointed tip for easy insertion.
- Plastic stakes are cheaper and lighter, but they can bend or break under tension—especially in windy areas. I only use them for temporary events or lightweight mini-lights.
For most backyards, I recommend 18–24 inch metal stakes with a loop or hook at the top. The height depends on your layout. For overhead crisscrossing, go taller. For ground-level accent lighting, shorter is fine.
Stake Spacing and Layout Planning
Before driving stakes into the ground, sketch a rough layout. Think about how the light will fall and where people will gather.
- For a canopy effect (lights crisscrossing above), place stakes 8–12 feet apart in a grid pattern. This mimics a pergola without the construction.
- For pathway lighting, line stakes along walkways or garden beds, spaced 4–6 feet apart.
- For a cozy nook, create a small triangle or square around a seating area.
Use garden twine or spray paint to mark stake locations. Step back and visualize the layout. Adjust if it feels too crowded or too sparse.
Preparing the Stakes for Installation
Once you’ve chosen your stakes, prep them for use:
- Clean off any rust or debris.
- If the top doesn’t have a built-in hook, use a carabiner clip or tie a small loop with weather-resistant wire.
- For extra stability, especially in soft soil, add a ground anchor sleeve (a metal tube that slides over the stake).
Pro tip: If you’re in a windy area, angle the stakes slightly outward (about 5–10 degrees) to help them resist leaning.
Step-by-Step Installation Guide
Now comes the fun part—installing your lights. I’ll walk you through the process I use every time, with real-world tips to avoid common mistakes.
Step 1: Mark and Install the Stakes
Start by using a rubber mallet or small sledgehammer to drive the stakes into the ground. I prefer a rubber mallet—it’s quieter and less likely to bend the metal.
- Push each stake down at least 12 inches for stability.
- Use a level (or your eye) to ensure stakes are straight.
- If you hit a rock or root, try angling slightly or relocate the stake by a foot.
For grassy areas, water the soil the night before. It makes insertion easier and reduces shock to the lawn.
Step 2: String the Lights
Now, attach your lights. Here’s how I do it:
- Start at the power source (usually the nearest outlet). Unroll the string and plug it in to test the bulbs.
- Clip or tie the first end to a stake using a carabiner, zip tie, or weatherproof cord.
- Walk the string to the next stake, keeping it taut but not stretched. Clip it at the top.
- Continue until all stakes are connected. For crisscrossing, use a figure-eight pattern—loop the string back and forth between stakes.
Don’t pull too hard! String lights can snap or pull stakes out of alignment.
Step 3: Adjust and Secure
Once all lights are strung, step back and check the layout.
- Adjust the sag between stakes. A slight dip (1–2 feet) looks more natural than a flat line.
- Use zip ties or light clips to secure loose sections, especially around corners or curves.
- If the lights sway in the wind, add a guy wire (thin, clear fishing line) from the top of one stake to the ground, anchored with a tent peg.
For a professional look, hide the power cord under mulch, along a fence, or in a conduit (plastic pipe).
Step 4: Test and Troubleshoot
Turn on the lights at dusk. Look for:
- Flickering bulbs (replace or check connections)
- Uneven spacing (adjust clips)
- Overheating (ensure lights are rated for outdoor use and not covered by fabric)
If one bulb burns out, don’t panic. Most modern string lights are designed so one failure won’t kill the whole strand.
Creative Layouts and Design Ideas
Once you’ve mastered the basics, it’s time to get creative. The beauty of using garden stakes is that you can change your layout seasonally or for different occasions.
Overhead Canopy (The Classic Look)
My favorite setup: a grid of lights above a seating area. I use 5 stakes in a rectangle (10×15 feet) and string the lights in a crisscross pattern. The result? A glowing “roof” that feels magical. For extra drama, add a central chandelier-style cluster in the middle.
Pathway and Border Lighting
Line garden beds or walkways with short stakes and mini-lights. I did this along my herb garden, and it’s become a favorite spot for evening strolls. Use warm white LEDs and space stakes 4 feet apart. Add a few fairy lights in mason jars on the stakes for a whimsical touch.
Tree-Like Illumination
No tall trees? No problem. Use 3–4 tall stakes (24+ inches) in a cluster to mimic a tree trunk. Wrap the lights around them in a spiral, then drape them outward like branches. I added faux ivy vines to the stakes for a natural look.
Festival-Style Stringing
For parties, go bold. Use color-changing LEDs and string them in zigzags, waves, or even a heart shape. I once created a “light tunnel” by stringing lights between two parallel rows of stakes. It was a hit at my sister’s birthday.
Seasonal Themes
Switch up your lights with the seasons:
- Spring: Pastel-colored mini-lights with floral clips.
- Summer: Warm white with citronella candles in between.
- Fall: Amber or orange LEDs with leaf-shaped cutouts.
- Winter: White or blue lights with icicle-style drops.
Safety, Maintenance, and Long-Term Care
Great lighting isn’t just about looks—it’s about safety and longevity. Here’s how to keep your setup safe and functional for years.
Electrical Safety
Always prioritize safety:
- Use only outdoor-rated lights, cords, and outlets.
- Install a ground fault circuit interrupter (GFCI) outlet. It cuts power if it detects a fault.
- Keep cords away from foot traffic. Use cord covers or bury them shallowly (with conduit).
- Never overload circuits. Check your home’s electrical load capacity.
I learned the hard way: once, a rainstorm soaked my extension cord, and the GFCI saved me from a shock. Now, I use a weatherproof outlet box with a flip-top lid.
Weatherproofing and Durability
Your lights will face sun, rain, wind, and snow. Protect them:
- Choose IP65 or higher rated lights (waterproof and dustproof).
- Use UV-resistant stakes and cords to prevent sun damage.
- During storms, consider unplugging lights or using a timer to limit exposure.
For winter, I remove my lights and store them in a dry place. But if you leave them up, use commercial-grade lights designed for year-round use.
Regular Maintenance
Check your setup every few months:
- Inspect stakes for rust or bending. Replace if needed.
- Clean bulbs with a dry cloth to remove dust and spider webs.
- Test all connections and replace frayed cords.
I keep a small repair kit: spare bulbs, zip ties, and a multimeter to test circuits.
Cost vs. Longevity: A Quick Comparison
Here’s a table comparing different options for long-term value:
| Light Type | Avg. Lifespan | Energy Cost (per year) | Maintenance Needs | Best For |
|---|---|---|---|---|
| LED String Lights | 25,000+ hours | $5–$15 | Low (replace bulbs rarely) | Permanent setups, year-round use |
| Incandescent String Lights | 2,000–3,000 hours | $20–$40 | High (frequent bulb changes) | Occasional events, vintage look |
| Solar String Lights | 10,000+ hours | $0 (after purchase) | Medium (clean panels, check batteries) | Eco-friendly, low-traffic areas |
| Plug-in with Timer | 15,000+ hours | $10–$20 | Low (set and forget) | Convenience, automatic operation |
For most backyards, LED string lights with a timer offer the best balance of cost, safety, and longevity.
Final Thoughts: Light Up Your Life
Putting string lights in your backyard with garden stakes isn’t just a DIY project—it’s an invitation to slow down, gather, and savor the quiet moments. I’ve hosted countless dinners, read books, and even stargazed under my lights. They’ve turned my backyard from an afterthought into a sanctuary.
Remember, there’s no “perfect” way to do this. Your backyard is unique, and your lighting should reflect that. Start small. Try a simple line of lights along your patio edge. Once you see how it transforms the space, you’ll be inspired to go bigger. And don’t be afraid to experiment—swap colors, change layouts, or add lanterns and candles for extra texture.
The best part? This is a project you can do in a weekend, for under $100. No permits, no contractors, no stress. Just you, your tools, and a vision. So grab those garden stakes, pick your favorite lights, and start stringing. The night is waiting—and it’s about to get a whole lot brighter.
Frequently Asked Questions
How do I install string lights in backyard with garden stakes without damaging my lawn?
Use adjustable metal or plastic garden stakes that can be gently pushed into the ground without requiring deep digging. Space stakes evenly along your desired layout, ensuring they’re stable enough to support the weight of the lights. This method preserves your lawn while creating a secure setup.
What type of garden stakes work best for string lights in backyard installations?
Opt for durable, weather-resistant stakes made of powder-coated steel, aluminum, or UV-protected plastic. Choose stakes with hooks, loops, or notches designed to hold string lights securely and prevent slipping.
Can I install string lights with garden stakes on uneven terrain?
Yes! Use adjustable-height stakes or tiered layouts to accommodate slopes or irregular ground. For stability, angle the stakes slightly outward and secure them with ground anchors if needed.
How do I keep string lights taut when using garden stakes?
Install turnbuckles or tensioners between stakes to pull the lights tight, preventing sagging. Ensure stakes are firmly planted and spaced no more than 5–6 feet apart for optimal support.
Are solar-powered string lights compatible with garden stakes for backyard use?
Absolutely. Solar string lights work well with garden stakes—just position the solar panel in direct sunlight and attach the light strand to the stakes. This avoids the need for outlets or extension cords.
How can I hide the cords and stakes when installing string lights in backyard spaces?
Use plantings, mulch, or small decorative stones to camouflage stakes and cords. For a cleaner look, run wires along existing landscape edges or under pathways where they’re less visible.

