Featured image for stringing outdoor cafe lights tree to patio
Image source: i.pinimg.com
Transform your patio into a magical outdoor retreat by effortlessly stringing cafe lights from tree to patio using simple, secure techniques that ensure a professional look. With the right hardware and a clear plan, you can create a warm, inviting ambiance perfect for entertaining or relaxing—no electrician required.
Key Takeaways
- Plan your layout first: Sketch the area to ensure even spacing and optimal coverage.
- Use durable, weatherproof lights: Choose LED or solar-powered options for longevity and safety.
- Secure lights with hooks or clips: Avoid nails; use removable hardware to protect trees.
- Measure extension cords accurately: Prevent overloading and ensure easy access to power sources.
- Test lights before installation: Verify functionality to avoid mid-stringing surprises.
- Create a layered effect: Mix heights and directions for a dynamic, inviting ambiance.
📑 Table of Contents
- Why Stringing Outdoor Cafe Lights Tree to Patio Transforms Your Space
- Choosing the Right Outdoor Cafe Lights for Your Setup
- Planning Your Layout: Distance, Height, and Aesthetics
- Step-by-Step Installation Guide (With Real-World Tips)
- Weatherproofing and Maintenance: Keep Your Lights Shining
- Creative Ideas and Troubleshooting Common Mistakes
- Final Thoughts: Light Up Your Life (Literally)
Why Stringing Outdoor Cafe Lights Tree to Patio Transforms Your Space
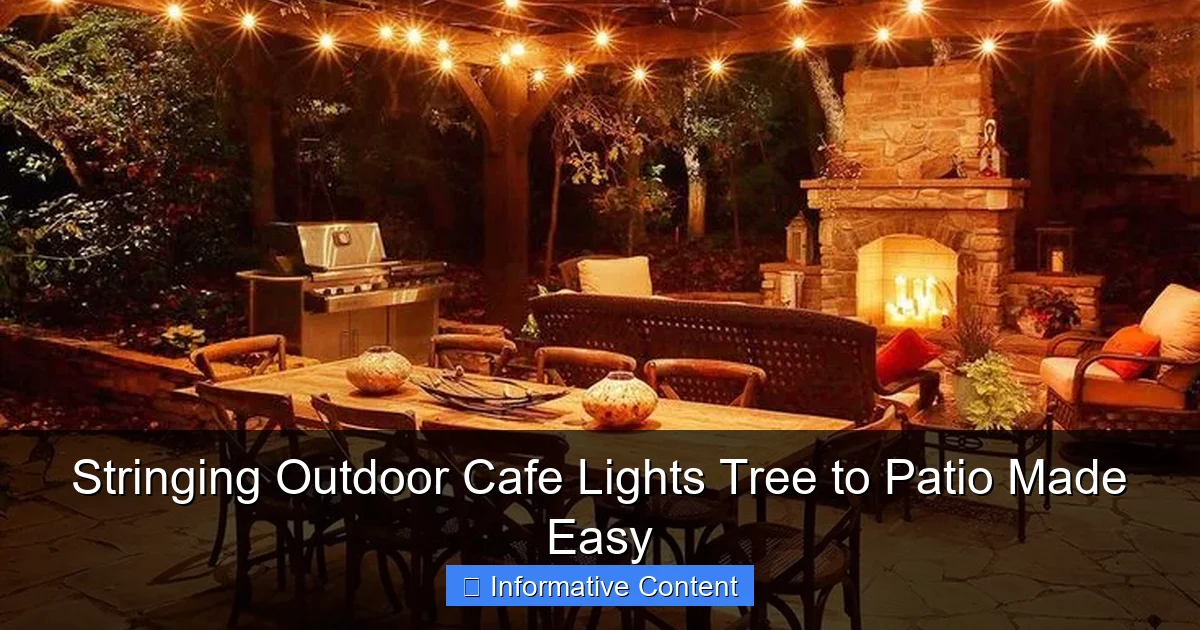
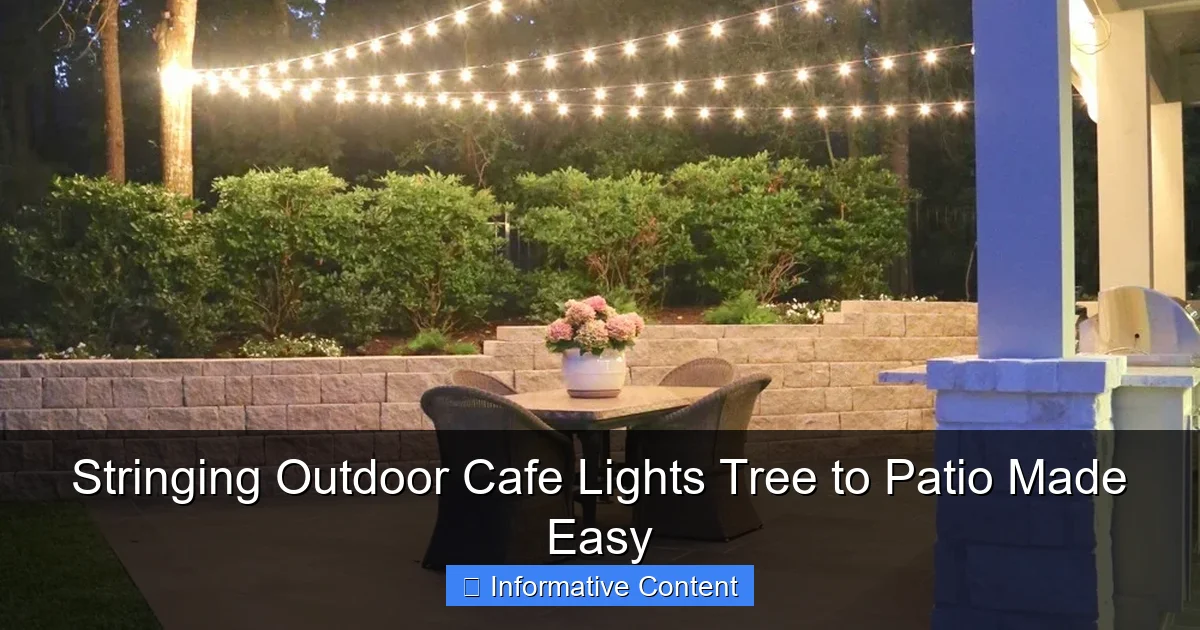
There’s something magical about stepping into a backyard at night and seeing twinkling cafe lights draped from a tree to the edge of your patio. It feels cozy, inviting, and instantly elevates your outdoor living experience. I remember the first time I strung lights between my oak tree and the back deck—my family gathered outside, sipping hot cocoa, and my kids said it felt like a “treehouse party.” That’s the power of outdoor cafe lights tree to patio setups: they turn ordinary evenings into moments worth remembering.
But let’s be honest—when I first started, I was intimidated. How high should I go? What kind of lights work best? Will the tree bark get damaged? I spent hours scrolling through Pinterest and YouTube, only to end up more confused. After a few trial runs (and one near-disaster involving a ladder and a squirrel), I cracked the code. Now, I want to share what I’ve learned so you can skip the stress and jump straight to the glow. Whether you’re lighting up a small balcony or a sprawling backyard, stringing outdoor cafe lights tree to patio is simpler than it looks—and the results are always worth it.
Choosing the Right Outdoor Cafe Lights for Your Setup
Types of Cafe Lights: What Works Best?
Not all string lights are created equal. When you’re planning a tree-to-patio layout, you need lights that can handle distance, weather, and visual impact. Here are the top options:
Visual guide about stringing outdoor cafe lights tree to patio
Image source: thecreativityexchange.com
- LED Edison Bulbs: My go-to choice. They’re energy-efficient, emit a warm, soft glow (2700K is ideal), and last for years. I used these for my oak-to-deck run, and they’ve survived three winters.
- Commercial-Grade String Lights: These are thicker, more durable, and often come with weatherproof sockets. Perfect if you’re spanning a long distance (20+ feet) or live in a rainy climate.
- Solar-Powered Lights: Great for eco-friendly setups, but I’ve found they’re less reliable in shaded areas or during cloudy weeks. Use them if your tree gets full sun during the day.
- Plug-In (AC) Lights: More consistent brightness and longer run times. You’ll need an outdoor GFCI outlet, but they’re ideal for year-round use.
Key Features to Look For
When shopping, don’t just grab the cheapest option. Here’s what matters:
- Weather Resistance: Look for IP44 or higher rating. This means they’re splash- and dust-resistant. My first set failed in a rainstorm because they were only rated IP20—lesson learned.
- Bulb Spacing: 6–12 inches apart is ideal. Too close, and it looks cluttered; too far, and the glow feels sparse. I prefer 8 inches for a balanced look.
- Length: Measure your distance first! Add 10–15% extra for sag and anchoring points. For a 25-foot span, buy 28–30 feet of lights.
- Plug Placement: Choose lights with the plug at the *end* of the string, not the beginning. It makes it easier to hide the plug near the outlet.
Pro Tip: Test Before You Buy
I once ordered 50 feet of lights online, only to discover they flickered when turned on. Now, I always buy one set locally first to test brightness, color, and durability. If it works, I buy the rest online for savings. A quick 10-minute test saves hours of frustration later.
Planning Your Layout: Distance, Height, and Aesthetics
Measure Twice, Hang Once
Before you touch a ladder, grab a tape measure and notebook. Here’s the process I use:
- Step 1: Measure the distance between your tree and patio anchor point. Use a laser measure if you have one—it’s way easier than dragging a 50-foot tape.
- Step 2: Decide on height. For a cozy feel, hang lights 8–10 feet high. For a dramatic canopy effect, go 12–15 feet. My oak tree has thick branches at 12 feet, which was perfect.
- Step 3: Sketch your plan. I draw a simple diagram with the tree, patio, and light path. Include anchor points (e.g., hooks, eye screws) and where the plug will go.
Creating the Perfect Sag (Yes, Sag Matters!)
You don’t want your lights to be tight like a guitar string. A slight catenary curve (a gentle U-shape) looks more elegant and reduces stress on the wires. Here’s how to achieve it:
- For every 10 feet of span, let the lights hang 6–12 inches lower in the middle. My 25-foot run has a 10-inch sag—it’s barely noticeable but makes all the difference visually.
- Use a level and string (or fishing line) to mark the sag point before installing lights. I tie a ribbon at the center to guide me.
Anchor Points: Tree vs. Patio
Trees and patios need different hardware:
- Tree Side: Use tree-safe straps (not nails or screws) to avoid damaging bark. I use 1-inch-wide nylon straps with a loop. They’re adjustable and don’t cut into the wood.
- Patio Side: Options include:
- Eye hooks screwed into deck posts (if you have a wood deck).
- Adhesive hooks for concrete or tile (test with a light first—some fail under weight).
- A freestanding pole or pergola for renters or no-drill setups.
Step-by-Step Installation Guide (With Real-World Tips)
Gather Your Tools and Safety First
Here’s my toolkit for a tree-to-patio install:
- Ladder (extendable, 12–16 feet)
- Work gloves (protect hands from bark and metal)
- Tree-safe straps or eye hooks
- Measuring tape and level
- Zip ties (for securing loose wires)
- Extension cord (if your outlet isn’t close)
Safety note: Never work alone if you’re using a ladder. I always have my husband spot me—even for simple jobs. And if your tree has thick branches, consider hiring a professional to help with the high points.
Installing the Tree Anchor Point
1. Choose a sturdy branch: Look for a horizontal branch at least 2 inches thick. Avoid dead or weak limbs.
2. Wrap the strap: Loop the tree-safe strap around the branch, leaving a 6-inch tail for the light hook. Tighten it so it won’t slip, but don’t overtighten—trees grow!
3. Add the hook: Attach a carabiner or S-hook to the strap. I use stainless steel to prevent rust.
Pro tip: If your branch is high, use a fishing line trick: Tie a weight (like a water bottle) to fishing line, throw it over the branch, and pull the strap up using the line. Saves ladder time!
Setting Up the Patio Anchor
1. For wood decks: Screw an eye hook into a deck post or beam. Use a drill with a pilot hole to avoid splitting wood.
2. For concrete patios: Use a masonry bit to drill a hole, insert a plastic anchor, then screw in the hook. Test it with a 5-pound weight before hanging lights.
3. For renters: Use a heavy-duty adhesive hook (3M makes a great one) or a freestanding umbrella base with a hook.
Hanging the Lights
1. Start at the patio: Attach one end of the lights to the patio hook.
2. Walk to the tree: Unspool the lights as you go. Don’t stretch them—let them hang loosely.
3. Attach the tree end: Clip the other end to the tree hook. Use zip ties to secure any loose wires to the strap.
4. Adjust the sag: Gently push the center of the lights down to your desired curve. Use a pole or broom handle if needed.
5. Hide the plug: Route the plug to the outlet using cable clips or zip ties. I tuck mine behind a planter for a clean look.
Weatherproofing and Maintenance: Keep Your Lights Shining
Protecting Against the Elements
Outdoor lights face rain, wind, snow, and UV rays. Here’s how to extend their life:
- Use outdoor-rated extension cords: Indoor cords degrade quickly. Look for “SJTW” or “SJTOW” labels—they’re weatherproof.
- Seal connections: Wrap plug connections with electrical tape or use a weatherproof outlet cover. I use a plastic storage bin with a hole cut in the side to shield mine.
- Trim overhanging branches: Falling twigs or leaves can damage wires. I prune my oak tree every spring.
Seasonal Care Tips
- Winter: If you live in a snowy area, consider removing lights in winter. I leave mine up but use LED bulbs (which generate less heat) and check for ice buildup.
- Spring: Inspect for damage. Replace any broken bulbs or frayed wires. My lights usually need 1–2 bulb changes per year.
- Summer: Clean bulbs with a damp cloth to remove pollen and dust. Avoid harsh chemicals—they can cloud the plastic.
When to Replace vs. Repair
Not all problems need a full replacement. Here’s my rule of thumb:
- Replace if: The wiring is frayed, the sockets are cracked, or more than 20% of bulbs are out.
- Repair if: A few bulbs are dead (replace individually) or the plug is loose (wrap with tape).
Creative Ideas and Troubleshooting Common Mistakes
Beyond Straight Lines: Unique Layouts
Don’t limit yourself to a single run! Try these ideas:
- X-Shape: String lights from the tree to both sides of the patio, creating an X. Great for large patios.
- Canopy Effect: Use multiple strings in parallel (like a grid) for a starry-sky look. I did this for a friend’s wedding and it was stunning.
- Layered Heights: Hang two sets at different levels (e.g., 8 feet and 12 feet) for depth.
- Pathway Lights: Add a second string along the walkway for safety and ambiance.
Fixing Common Problems
Here’s how I’ve solved issues over the years:
- Problem: Lights flicker.
- Solution: Check connections and replace dead bulbs. I once had a flickering set—it was a single loose bulb!
- Problem: Sagging too much.
- Solution: Add a third anchor point in the middle (e.g., a pole or another tree). Use a turnbuckle to adjust tension.
- Problem: Tree bark is damaged.
- Solution: Remove nails/screws and switch to straps. Apply tree wound dressing if needed.
- Problem: Not enough outlets.
- Solution: Use a smart plug with a timer. I control my lights with my phone and schedule them to turn on at sunset.
Data Table: Recommended Products for Tree-to-Patio Setups
| Product Type | Recommended Brand | Key Features | Price Range |
|---|---|---|---|
| LED String Lights | Brightech Ambience Pro | IP65 weatherproof, 24ft, Edison bulbs | $35–$50 |
| Tree-Safe Straps | Tree Strap Pro | 1-inch nylon, 600lb capacity, adjustable | $15–$20 (2-pack) |
| Eye Hooks (Wood) | Hillman 3/8″ x 3″ | Zinc-plated, 250lb load | $5 (5-pack) |
| Adhesive Hooks (Concrete) | 3M Command Outdoor | Holds 5lbs, UV-resistant | $8 (4-pack) |
| Extension Cord | Southwire 25ft | SJTW, 16-gauge, weatherproof | $20–$25 |
Final Thoughts: Light Up Your Life (Literally)
Stringing outdoor cafe lights tree to patio isn’t just about decor—it’s about creating a vibe. I’ve hosted dinners, read books, and even stargazed under mine. The process might seem daunting at first, but once you break it down, it’s surprisingly simple. Start small: measure your space, pick quality lights, and take your time with the install. And remember, it’s okay if it’s not perfect. My first attempt had a lopsided sag and a missing bulb, but my family still loved it. The joy is in the doing.
As you plan your setup, keep one thing in mind: these lights aren’t just for parties. They’re for quiet nights, rainy evenings, and the moments in between. Whether you’re a DIY newbie or a seasoned pro, the glow of cafe lights will make your outdoor space feel like home. So grab a ladder, a friend, and your favorite string lights. The magic is waiting—just beyond the tree.
Frequently Asked Questions
How do I safely string outdoor cafe lights from a tree to my patio?
Use weather-resistant LED cafe lights and secure them with durable, UV-resistant zip ties or hooks rated for outdoor use. Always check tree branch strength and avoid overloading circuits to prevent hazards.
What’s the best way to plan the layout when stringing outdoor cafe lights tree to patio?
Measure the distance between the tree and patio, then map out support points (e.g., hooks, poles) to ensure even spacing. Leave slack for wind movement and use a guide wire if spanning over 20 feet.
Can I leave outdoor cafe lights up year-round, even in winter?
Only if they’re specifically rated for all-weather use (check IP65 or higher). For extreme climates, consider removable options or take them down during storms to extend lifespan.
Do I need a transformer or special outlet for stringing cafe lights from a tree to patio?
Most outdoor cafe lights use a standard 120V plug-in transformer. For long runs, calculate total wattage to avoid overloads or use a commercial-grade low-voltage system.
How do I avoid damaging my tree when installing cafe lights?
Use soft, wide straps or nylon cords instead of metal wires to prevent bark damage. Avoid drilling into the tree and opt for removable clips or ties that won’t girdle branches.
What are the most durable outdoor cafe lights for a tree-to-patio setup?
Look for commercial-grade, shatterproof LED bulbs with IP65+ weatherproof ratings. Brands like Brightech or Gerson offer sturdy, long-lasting options designed for outdoor stringing projects.